How To Interpret Slope From a Graph Worksheet: A Step-by-Step Guide
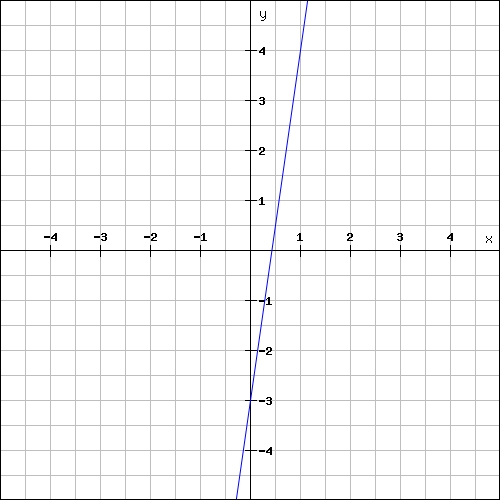
Step 1: Understand the concept of slope. Slope is a measure of how steep a line is when graphed on a coordinate plane. It is the ratio of the rise (vertical change) to the run (horizontal change) between two points on the line.
Step 2: Identify the two points on the graph that you need to calculate the slope. These two points will be the points that intersect the line being graphed. Note the coordinates of each point.
Step 3: Calculate the slope. To calculate the slope, divide the rise (the difference between the y-coordinates of the two points) by the run (the difference between the x-coordinates of the two points).
[toc]
Step 4: Interpret the slope. Slopes can be interpreted in different ways. A positive slope indicates the line is going up from left to right, while a negative slope indicates the line is going down from left to right. A slope of zero indicates a horizontal line. A slope that is steep indicates a line that is either rising or falling quickly. A shallow slope indicates a line that is changing slowly.
Tips for Accurately Calculating Slope From a Graph Worksheet
1. Using a ruler and graph paper, draw a line that connects two points. Make sure that the line is straight and that there is equal distance between each point.
2. Measure the ‘rise’ and ‘run’ of the line. The ‘rise’ is the amount of vertical distance between the two points and the ‘run’ is the amount of horizontal distance between the two points.
3. Calculate the slope of the line. The slope is calculated by dividing the ‘rise’ by the ‘run’.
4. Check the accuracy of the calculation. To do this, draw a new line (making sure that it is straight and has equal distance between each point) that is parallel to the original line. Measure the ‘rise’ and ‘run’ of the new line, calculate the slope and compare it to the slope of the original line. If the two slopes are equal, then the calculation is accurate.

5. When calculating the slope of more than two points, draw a line that connects all the points. Measure the ‘rise’ and ‘run’ of the line and calculate the slope as you would with two points.
6. If the points are not evenly distributed, use the average of the ‘rise’ and ‘run’ of all the points to calculate the slope.
The Benefits of Slope From a Graph Worksheet in Math Class
In a math class, a slope from a graph worksheet can be a beneficial tool for students to learn how to interpret and analyze data. The worksheet encourages students to consider the relationship between two variables, and how changes in one variable can affect the other.
Slope is defined as the rate at which one variable changes relative to the other. When graphed, the slope can be determined by looking at the rate of change of the graph and is represented by a line. By calculating the slope of a graph, students can gain a better understanding of the relationship between the two variables and how their interactions will affect the outcome.
The worksheet provides a visual representation of the data, and allows students to analyze the data more easily. By looking at the graph, students can determine the rate at which the variables interact, and can develop an understanding of the correlation between the two variables. Through the use of the worksheet, students can gain an in-depth knowledge of the relationships between the two variables.
A slope from a graph worksheet can also be used to reinforce the learning of basic math skills, such as linear equations. By using the worksheet, students can practice solving equations and apply their understanding of the slope of a graph to solve mathematical problems. Through practice, students can become more confident in their ability to identify and analyze data.
The worksheet can also be used to help students understand the concepts of slope and how it can be applied to life outside of the classroom. By understanding the concept of slope, students can more easily recognize and analyze relationships in real-world situations.
In conclusion, a slope from a graph worksheet can be an invaluable tool for math classes. By providing students with a visual representation of data, the worksheet allows for the interpretation and analysis of data. Additionally, the worksheet encourages students to practice their understanding of linear equations and can help them gain an understanding of the relationships between two variables. Furthermore, the worksheet can help students understand the concept of slope and how it can be applied to real-world situations.
Using Slope From a Graph Worksheet to Teach Algebraic Concepts
The use of a slope from a graph worksheet is an effective way to teach students algebraic concepts. A graph can provide a visual representation of the concept of slope and can be used to solve linear equations. By using a worksheet, students can gain a better understanding of the concepts of slope and linear equations.
The worksheet provides students with a graph and a set of questions. The graph in the worksheet is a line graph that is drawn on the coordinate plane. The graph shows the relationship between two points. The questions ask students to calculate the slope of the line, the equation of the line, and the point at which the line intersects the x-axis.
In order to solve the questions, students must use the slope formula to calculate the slope of the line. The slope is determined by taking the change in y-values divided by the change in x-values. After calculating the slope, students can then use the slope-intercept form of a line to calculate the equation of the line. The equation of the line is determined by plugging in the slope and the point at which the line intersects the x-axis into the equation.
By using the slope of a graph worksheet, students can gain a better understanding of the concepts of slope and linear equations. This worksheet serves as a great way to introduce students to algebraic concepts and to help them understand the concepts more thoroughly.
Understanding Slope From a Graph Worksheet: Strategies for Struggling Learners
Slope is an important concept to understand in the study of mathematics. For some students, understanding the concept of slope can be difficult, and this can be especially true when trying to learn to interpret slope from a graph. For such students, the following strategies can be used to help them understand the concept and learn to read slope from a graph.
The first strategy is to encourage the student to draw a straight line on the graph that connects two points. This line should be parallel to the x-axis and the y-axis. Then, the student should measure the change in the y-value (the vertical distance) divided by the change in the x-value (the horizontal distance). This calculated value is the slope.
The second strategy is to use a visual aid. To do this, the student should draw a triangle using the two points as the base and the y-axis as the height. This triangle should be labeled with the x-value, y-value and the slope. The student should then use the triangle to calculate the slope.
The third strategy is to use a graph paper that has the scale already marked. This graph paper will help the student visualize the slope. He or she should draw a line that connects two points and measure the change in the y-value divided by the change in the x-value. This will give the student the slope.
Finally, the student should practice reading and interpreting slope from a graph. This can be done by having the student look at different graphs and calculate the slope. This practice will help the student understand the concept better and be able to read and interpret slope from a graph.
By using these strategies, struggling learners can better understand the concept of slope and learn to read slope from a graph. With enough practice, the student will soon be able to interpret and read slope from a graph with ease.
Exploring Real-Life Examples of Slope From a Graph Worksheet
Slope is a measure of the steepness of a line on a graph. It is the ratio of the vertical change of a line to its horizontal change. Slope can be positive, negative, zero, or undefined, depending on how the line is plotted. In this worksheet, we will explore some real-life examples of slope from a graph.
The first example of slope is the graph of a skier taking a downhill slope. In this graph, the skier’s speed is plotted on the vertical axis and the time is plotted on the horizontal axis. The slope of the line in this graph is positive, as the skier’s speed increases as time passes.
The second example of slope is the graph of a ball rolling down an inclined plane. In this graph, the ball’s height is plotted on the vertical axis and the distance is plotted on the horizontal axis. The slope of the line in this graph is also positive, as the ball’s height decreases as the distance increases.
The third example of slope is the graph of a rocket’s trajectory. In this graph, the rocket’s height is plotted on the vertical axis and the time is plotted on the horizontal axis. The slope of the line in this graph is negative, as the rocket’s height decreases as time passes.
The fourth example of slope is the graph of a person walking up a flight of stairs. In this graph, the person’s height is plotted on the vertical axis and the number of steps is plotted on the horizontal axis. The slope of the line in this graph is positive, as the person’s height increases as the number of steps increases.
These examples demonstrate how the slope of a line can tell us a lot about the data being plotted. By understanding the slope of a line, we can gain insights into how different phenomena are changing over time.
Creative Ways to Incorporate Slope From a Graph Worksheet into Math Lessons
Incorporating slope from a graph worksheet into math lessons can be an effective way to help students understand the concept of slope and its importance in mathematics. Slope is an essential concept in algebra and geometry, so it is important for students to understand how to calculate and interpret it. By introducing slope from a graph worksheet into math lessons, teachers can provide students with meaningful practice that will help them better understand this concept.
One effective way to incorporate slope from a graph worksheet into math lessons is to ask students to identify the slope of a given graph. Students can begin by choosing a graph from the worksheet and then analyzing it to determine the slope. Once they have determined the slope, they can use this information to answer questions related to the graph. For example, they can calculate the rate of change between two points on the graph or the equation of the line.
Another way to incorporate slope from a graph worksheet into math lessons is to ask students to use the graph to solve a problem. For example, students can be asked to determine the equation of a line for a given graph. This will require them to analyze the graph and determine the slope, intercept, and equation of the line. After they have determined the equation, they can use this to solve other related problems.
Finally, teachers can use slope from a graph worksheet to provide students with practice in graphing equations. Students can be asked to graph equations based on the given graph and then use the graph to answer questions about the equation. This will help them gain experience in graphing equations and will help them better understand how to interpret and use slope in mathematics.
By incorporating slope from a graph worksheet into math lessons, teachers can help students gain a better understanding of this important concept. Doing so will help students become more confident in their mathematical abilities and will ultimately lead to improved performance on tests and assessments.
Common Mistakes to Avoid When Working with Slope From a Graph Worksheet
1. Misinterpreting the Graph: One of the most common mistakes that people make when working with slope from a graph is misinterpreting the graph. This can be done by not properly understanding the meaning of the axes, the scale, and the context of the graph. To avoid this mistake, it is important to take the time to carefully analyze the information presented in the graph and understand how it relates to the slope.
2. Not Labeling Axes and Scale: Another common mistake is not labeling the axes and scale of the graph. When working with slope, one must be able to clearly identify the points on the graph and accurately interpret the changes in the slope. By labeling the axes and scale, the graph will become easier to understand, and the slope can be properly measured.
3. Ignoring the Context of the Graph: When working with slope from a graph, it is also important to take into consideration the context of the graph. This includes looking at the overall trend of the data and understanding how the slope is affected by the changes in the data. Without considering the context, it is easy to make inaccurate assumptions about the slope.
4. Ignoring the Units: Another common mistake is ignoring the units of the graph. When calculating the slope, it is important to remember to include the units of the graph in order to calculate the correct answer. Ignoring the units can lead to miscalculations and inaccurate results.
5. Not Drawing a Line of Best Fit: Finally, when working with slope from a graph, it is important to draw a line of best fit. This will help to measure the slope more accurately and provide a more accurate representation of the data. Without this line, it can be difficult to accurately measure the slope.
Exploring the Relationship Between Slope and Linear Equations Using Graph Worksheets
The relationship between the slope and linear equations can be explored using graph worksheets. This exploration can provide valuable insights into the behavior of linear equations and how they are affected by the slope.
Slope is defined as the change in the y-value divided by the corresponding change in the x-value. This ratio is used to determine the rate of change of a linear equation. A graph worksheet can provide a visual representation of this relationship. By plotting the values of x and y on the graph, the slope of the linear equation can be easily determined.
The slope of a linear equation can have a significant impact on the behavior of the equation. For example, a steep slope can lead to rapid changes in the equation, while a shallow slope can lead to slower changes. By examining the graph, it is possible to determine how the slope affects the equation.
In addition to the slope, linear equations can also be affected by other factors such as the intercept, coefficient, and other parameters. Graph worksheets can also be used to explore these relationships. By plotting different values for the intercept, coefficient, and other parameters, it is possible to determine how these factors affect the equation.
Graph worksheets can provide valuable insights into the behavior of linear equations and the relationship between the slope and the other parameters. By plotting the values of x and y on the graph, it is possible to determine how the slope affects the equation and how the other parameters affect it. By exploring these relationships, it is possible to gain a better understanding of linear equations and how they are affected by the slope.
How to Use Slope From a Graph Worksheet to Make Predictions and Draw Conclusions
Drawing conclusions and making predictions using a slope from a graph worksheet requires a few basic steps. First, the student must identify the independent and dependent variables on the graph. The independent variable is the one that is changed, while the dependent variable is the one that is affected by the change in the independent variable. Once the variables have been identified, the student must then identify the slope of the graph. This can be done by counting the number of units the dependent variable changes for each unit change in the independent variable.
Next, the student must use the slope to predict the value of the dependent variable when the independent variable is changed. This can be done by multiplying the slope by the amount of change in the independent variable, and then adding or subtracting this value from the initial dependent variable value.
Finally, the student can draw conclusions based on the slope of the graph. If the slope is positive, the student can conclude that an increase in the independent variable causes an increase in the dependent variable. Conversely, if the slope is negative, the student can conclude that an increase in the independent variable causes a decrease in the dependent variable.
Using the slope from a graph worksheet to make predictions and draw conclusions can help students understand the relationship between variables, and can provide valuable insight into how changes in one variable can affect the other.
Conclusion
The Slope From A Graph Worksheet is a great tool for teaching students the basics of graphing and understanding the concept of slope. It provides an engaging way to practice graphing and understanding the concept of slope, which is essential for students who are learning algebra and other mathematics topics. By completing the worksheet, students can gain a better understanding of slope, which can help them in their future math studies.
[addtoany]
5 photos of the "Slope From A Graph Worksheet"
Related posts of "Slope From A Graph Worksheet"
Composite Function Worksheet Answer Key
Explaining the Basics of Composite Function Worksheet Answer KeysComposite functions are an important concept in mathematics that allow us to combine two or more functions, resulting in a single, new function. The worksheet answer keys provided can be used to help students understand the basics of working with composite functions. To begin, let’s define a...
Types Of Chemical Reactions Worksheet
Exploring the Different Types of Chemical Reactions Through a Types of Chemical Reactions WorksheetA chemical reaction is an important process in many aspects of life, from the production of energy and materials to the breakdown of substances and the formation of new compounds. Understanding the different types of chemical reactions and the processes involved can...
Spongebob Scientific Method Worksheet
How SpongeBob's Scientific Method Worksheet Can Help Kids Master Science ConceptsThe SpongeBob's Scientific Method Worksheet is an excellent resource for helping children of all ages master the fundamentals of science. This worksheet is designed to provide an easy-to-follow framework for understanding the core concepts behind the scientific method. The worksheet is divided into two main...

The Story Of Stuff Worksheet
How The Story of Stuff Worksheet Can Help Teach Sustainable Consumption Habits The Story of Stuff Worksheet is an interactive educational tool designed to help individuals understand the effects of their consumption habits on the environment. This worksheet can help to promote sustainable consumption habits by providing a comprehensive overview of the environmental, social, and...