Exploring the Benefits of Using a Velocity Time Graph Worksheet
A velocity time graph worksheet is an invaluable tool for students of physics and engineering. This type of graph allows users to easily visualize the relationship between time and velocity, a key concept in these disciplines. By plotting data points on the graph, users can quickly identify trends in the data and draw conclusions about the relationship between time and velocity.
The use of a velocity time graph worksheet offers several benefits. First, it provides an intuitive way for users to visualize the data. Rather than having to read through a table of numbers, a velocity time graph worksheet allows users to quickly identify trends in the data and draw conclusions. This helps to save time and improve understanding.
Second, using a velocity time graph worksheet helps to simplify complex equations. This type of graph allows users to solve equations quickly and accurately. By plotting data points on the worksheet, users can quickly identify the slope of the line and use it to solve equations. This simplifies the process of solving equations and helps to save time.
[toc]
Third, a velocity time graph worksheet can be used to model real-world phenomena. By plotting data points on the graph, users can quickly identify trends in the data and draw conclusions about how the data relates to real-world events. This is particularly useful for physics and engineering students, who need to understand how physical phenomena work.
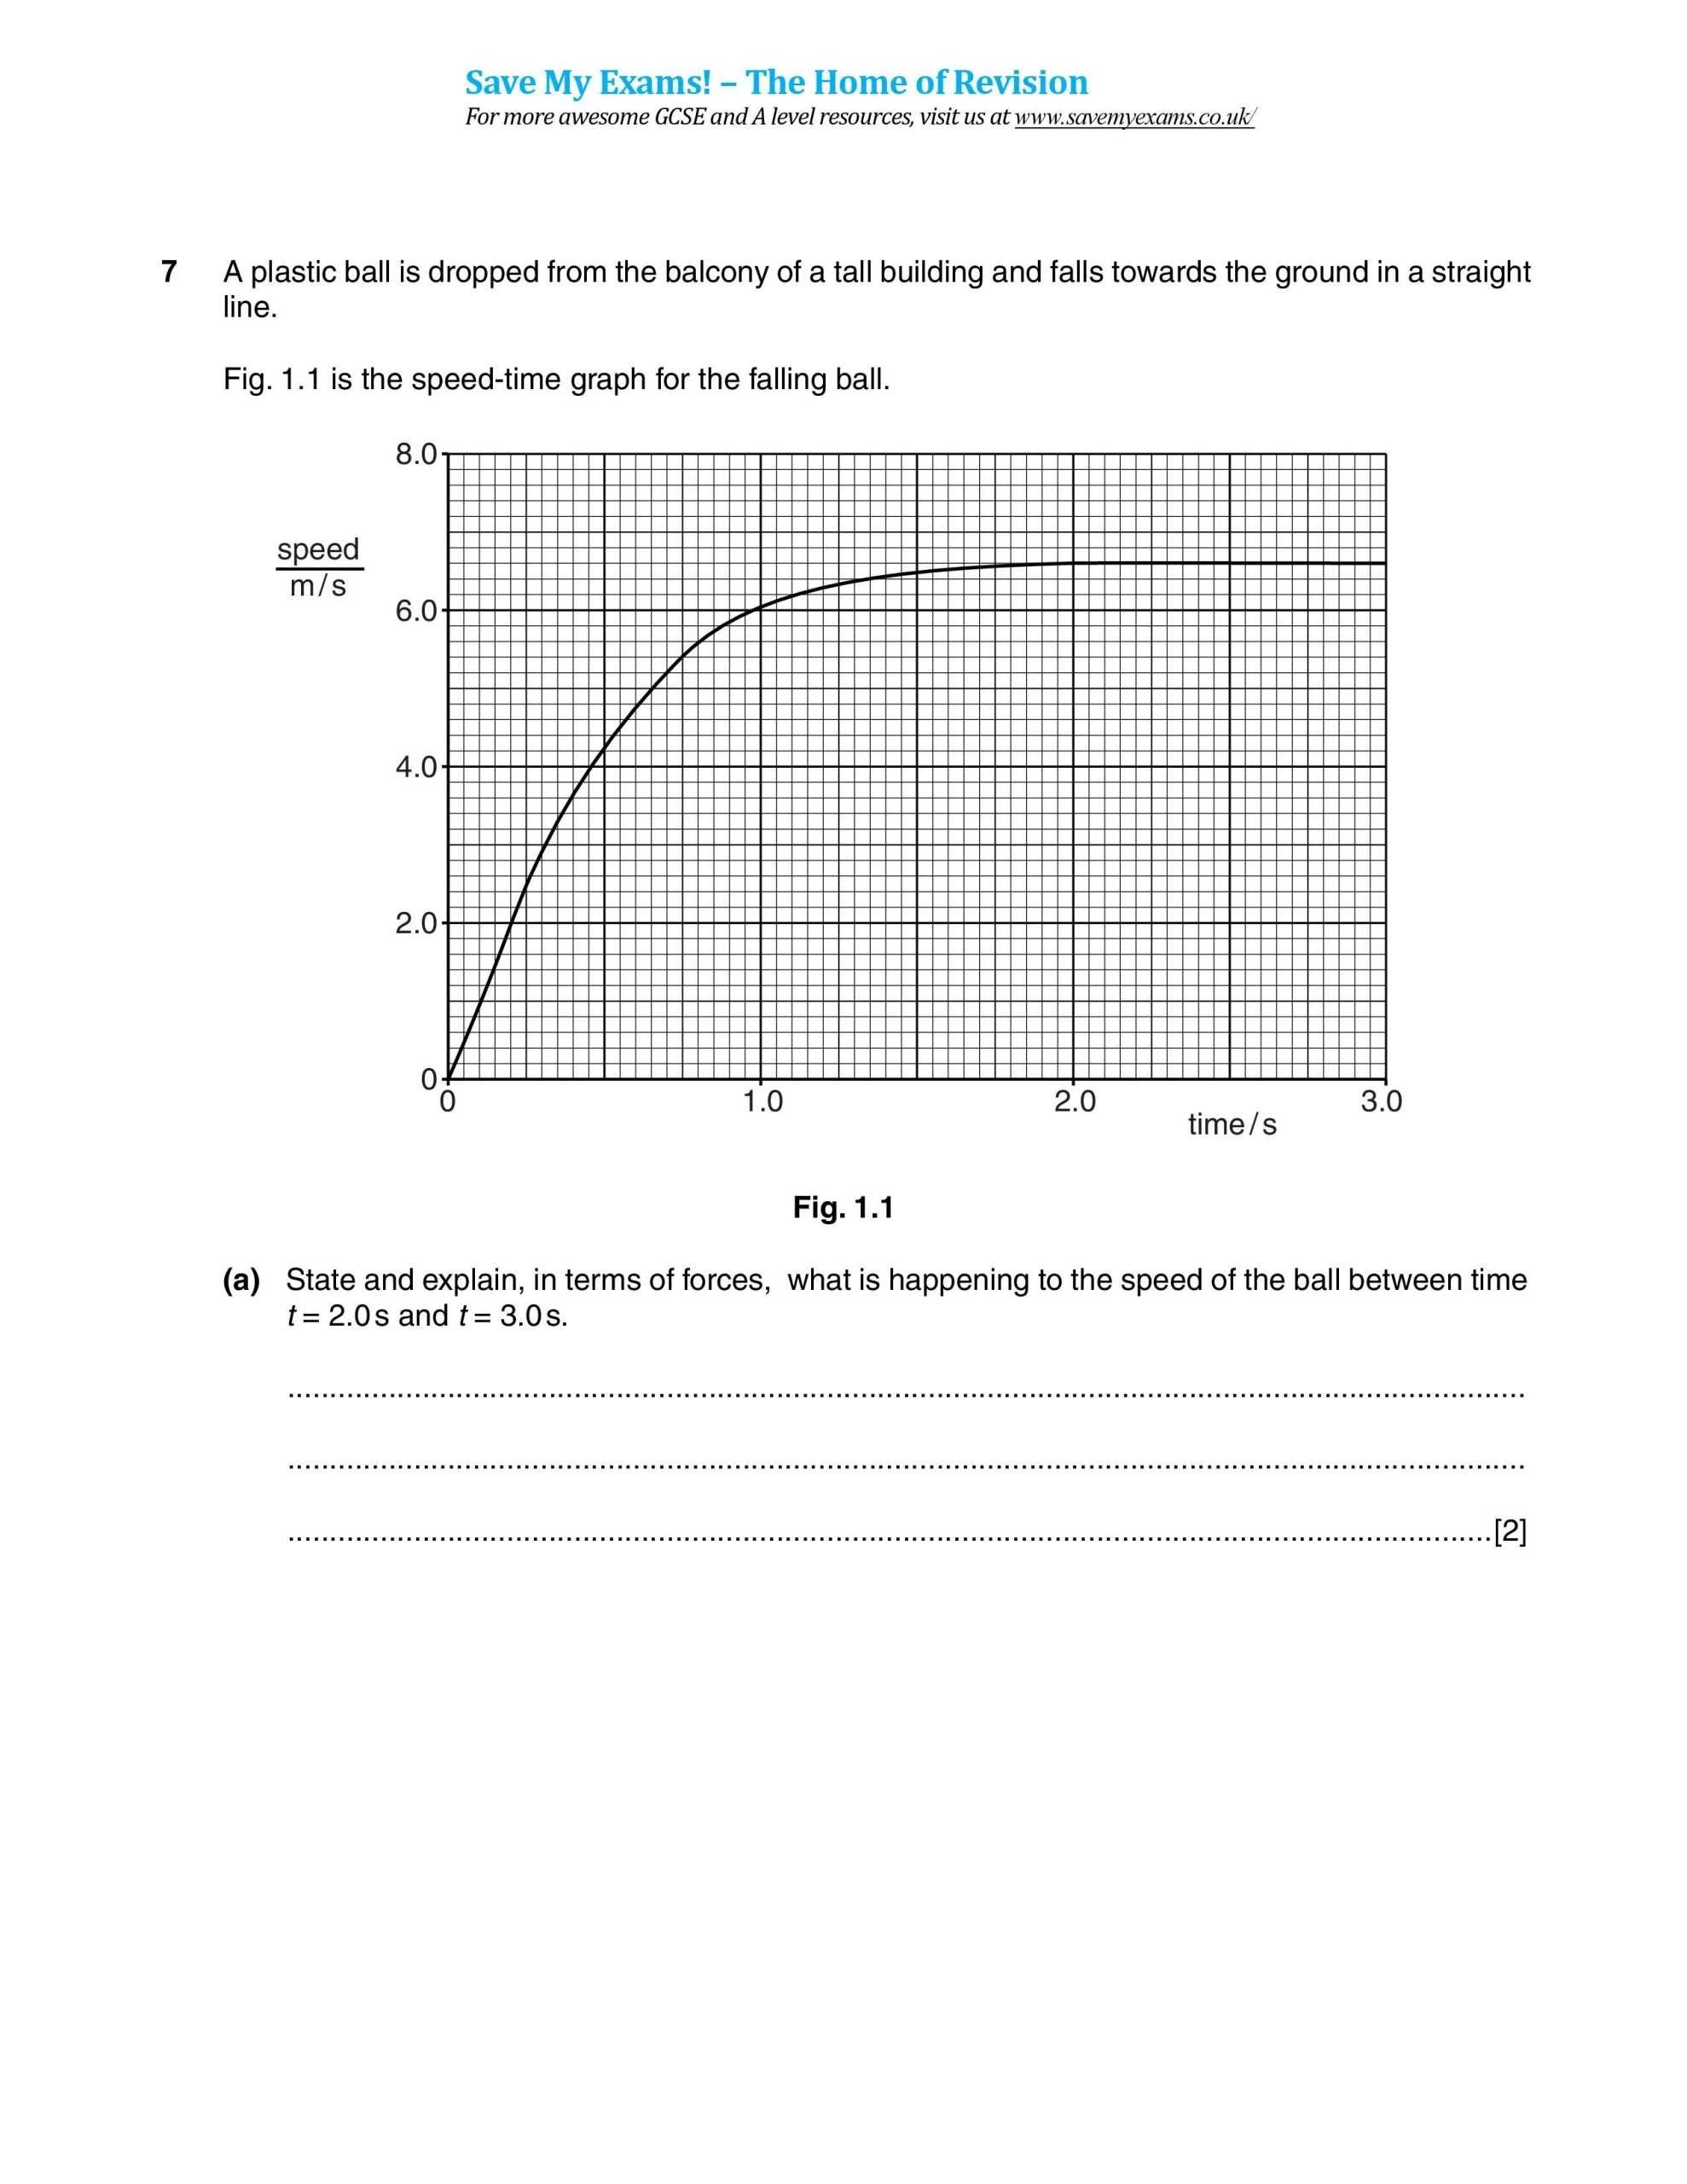
Finally, a velocity time graph worksheet can be used to visualize data from experiments. By plotting data points on the graph, users can quickly identify the trends in the data and draw conclusions about what is happening in the experiment. This helps to improve understanding and helps to make experiments more efficient.
In conclusion, a velocity time graph worksheet is an invaluable tool for students of physics and engineering. It provides an intuitive way to visualize data, simplifies equations, and can be used to model real-world phenomena. By plotting data points on the worksheet, users can quickly identify trends in the data and draw conclusions about how the data relates to real-world events. This helps to save time and improve understanding.
How to Create an Accurate Velocity Time Graph Worksheet
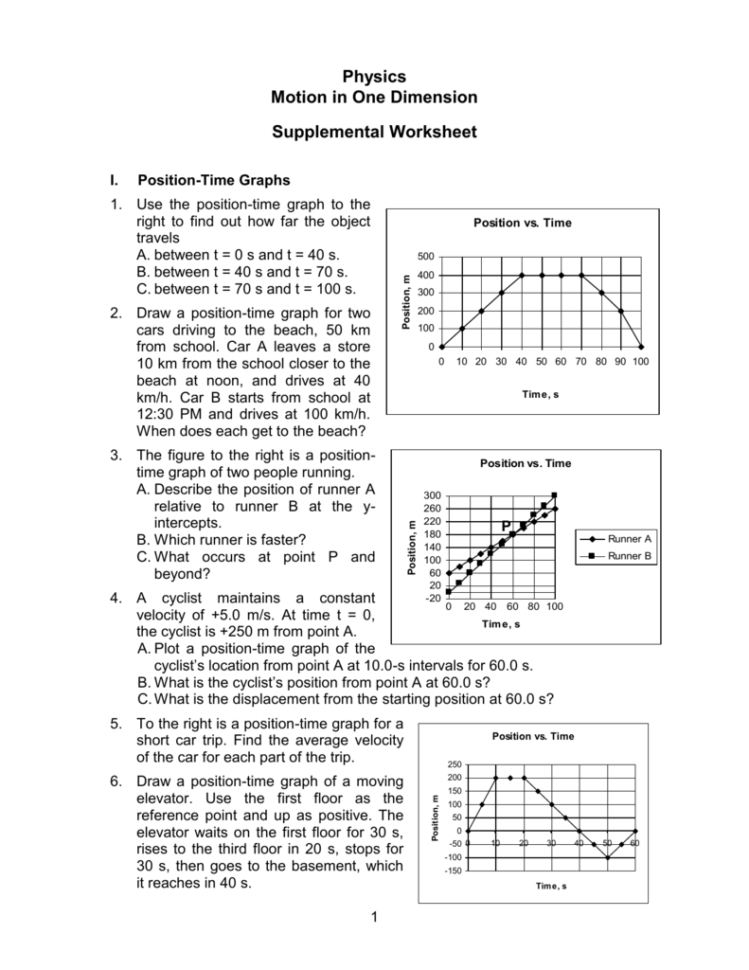
Creating an accurate velocity-time graph worksheet is an important part of understanding the dynamics of motion. The worksheet should be comprehensive and detailed, so that students can understand the concept and use the information to solve problems. Here are the steps to create a velocity-time graph worksheet.
1. Create a table with two columns, one labeled ‘Time’ and the other labeled ‘Velocity’.
2. Define the parameters of the graph. This includes defining the time interval (e.g. seconds, minutes, hours), the velocity range (e.g. 0-10 m/s), and the number of points on the graph (e.g. 10 points).
3. Fill in the table with a series of time and velocity values. The values should be evenly spaced, and should span the range of the graph.
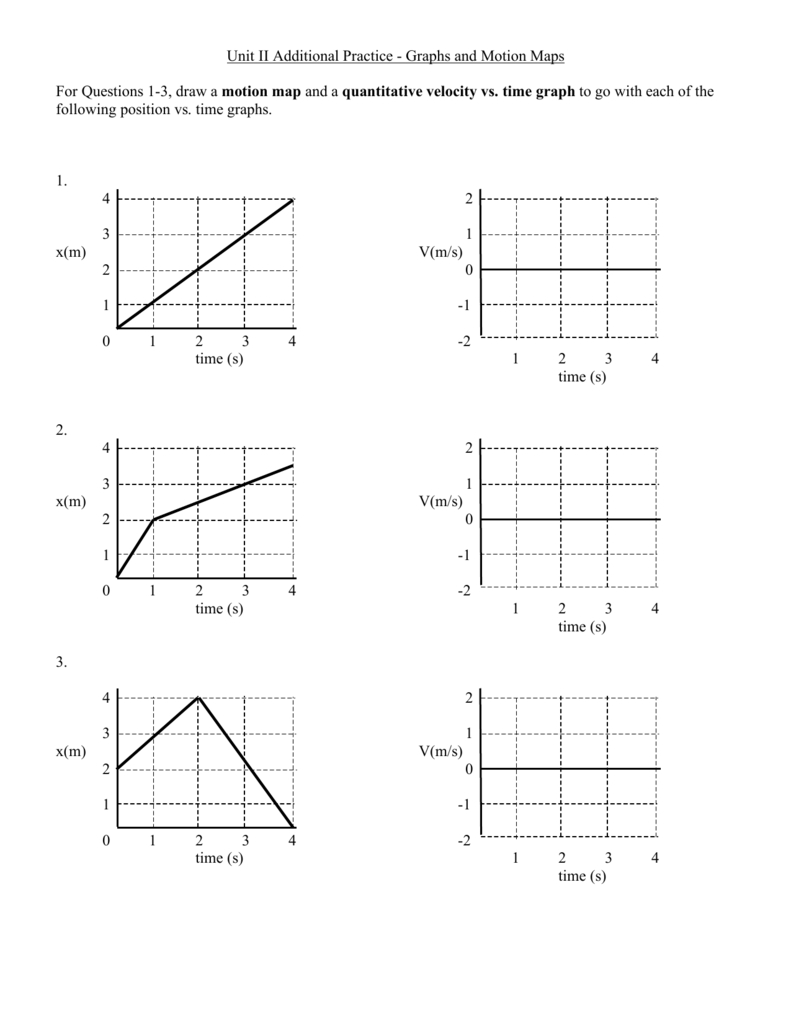
4. Plot the points on the graph. Connect the points with a line to create a velocity-time graph.
5. Label the axes of the graph. The x-axis should be labeled ‘Time’ and the y-axis should be labeled ‘Velocity’.
6. Provide a title for the graph.
7. Discuss the implications of the graph. Explain the meaning of the velocity-time graph, and provide examples of how it can be used to solve problems.
By following these steps, you can create an accurate velocity-time graph worksheet that will help students understand the dynamics of motion.
Tips for Interpreting Velocity Time Graphs
Understanding the Concepts Behind Velocity Time Graphs
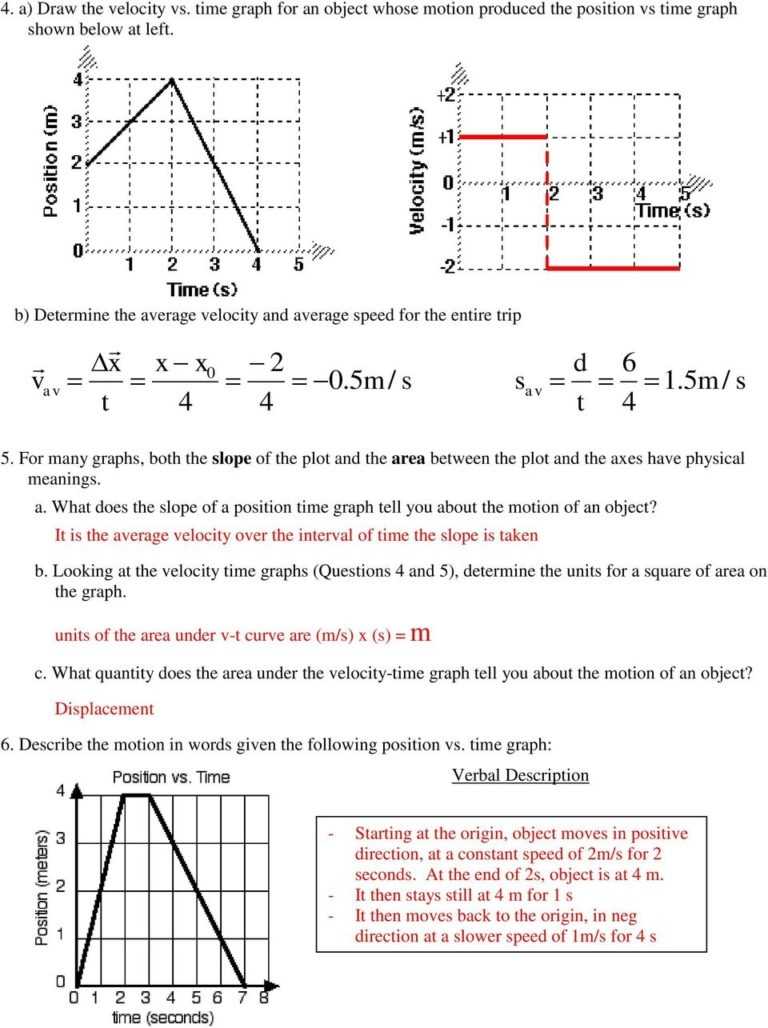
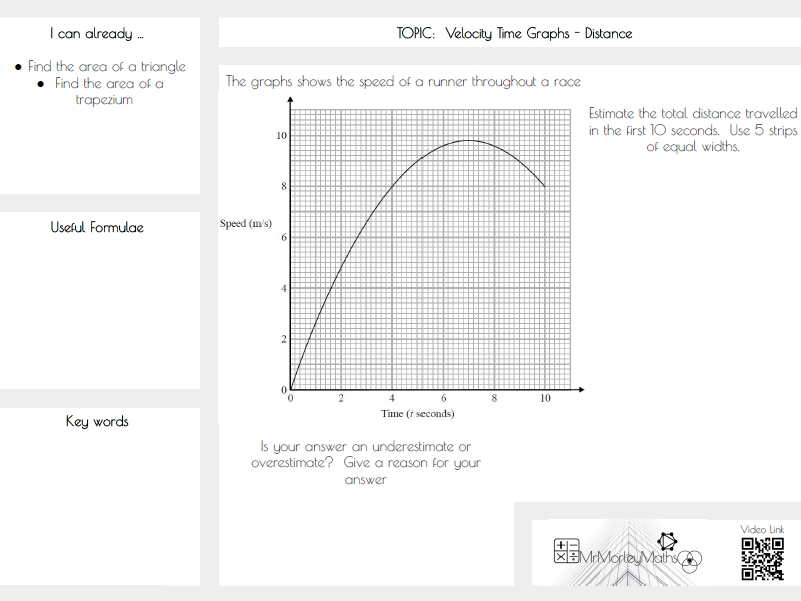
Velocity-time graphs are a visual representation of the motion of an object. They consist of a line graph showing velocity on the vertical axis and time on the horizontal axis. The line on the graph shows the velocity of the object at any given point in time.
A velocity-time graph can be used to describe the motion of an object over a period of time. It is useful for analyzing the average speed, acceleration, and deceleration of the object. It can also be used to calculate the displacement of the object.
A velocity-time graph is typically composed of four distinct phases. The first is the initial velocity, which is the velocity at the start of the motion. The second is the constant velocity, which is when the speed of the object remains constant. The third is the acceleration, which is when the speed increases over time. The fourth is the deceleration, which is when the velocity decreases over time.
At the start of the graph, the initial velocity is shown. This is followed by the constant velocity phase. During this phase, the velocity of the object remains constant. The acceleration phase is indicated by an upward slope, showing the increasing speed of the object. The deceleration phase is indicated by a downward slope, showing the decreasing speed of the object.
The area beneath the line on a velocity-time graph represents the displacement of the object. The displacement is the distance the object moves from its initial position. It can be calculated by finding the area beneath the line on the graph.
Velocity-time graphs are a useful tool for analyzing the motion of an object. They provide visual representations of the speed, acceleration, and deceleration of the object, as well as the displacement. By understanding the concepts behind velocity-time graphs, one can gain a better understanding of the motion of an object.
Conclusion
The Velocity Time Graph Worksheet is a helpful tool for understanding and analyzing the motion of an object. It can help visualize the relationship between the velocity of an object and its position over time. This worksheet can also be used to find the average speed and the instantaneous speed of an object. This worksheet can be used for a variety of applications, such as studying the motion of a car or a ball. With the help of this worksheet, students can gain a better understanding of the motion of objects and the physics behind them.
[addtoany]
5 photos of the "Velocity Time Graph Worksheet"
Related posts of "Velocity Time Graph Worksheet"

Medical Terminology Abbreviations Worksheet
Creating an Effective Medical Terminology Abbreviations Worksheet for Your PracticeA medical terminology abbreviations worksheet can be an invaluable tool for your medical practice. It can help ensure accuracy and consistency in your medical documents, and can also be used to help your staff, including physicians, nurses, and administrative staff, to learn and remember medical terms...
Punnett Square Practice Worksheet Answers
Exploring the Benefits of Punnett Square Practice Worksheets for Genetics EducationPunnett Square practice worksheets are an invaluable tool for genetics education. This is because they allow students to gain a firm foundation in the basics of Mendelian genetics. Through the use of these worksheets, students can gain a better understanding of the principles of inheritance...
Rounding Decimals Worksheet 5th Grade
How to Use Rounding Decimals Worksheets to Teach 5th Grade MathRounding decimals worksheets can be an effective teaching tool to help 5th grade students learn how to use decimal numbers. By providing students with a series of worksheets that involve rounding decimals, teachers can introduce students to the concept of decimal numbers and help them...
The Constitution Worksheet Answers
Exploring the Founding Fathers’ Intentions: An Analysis of The Constitution Worksheet AnswersThe Constitution of the United States of America has been a cornerstone of American government since its ratification in 1788. As the nation’s written fundamental law, it serves as the basis of the federal government’s structure and provides the framework for its ongoing operation....