How to Use a Graphing Absolute Value Inequalities Worksheet to Understand the Concept
A graphing absolute value inequalities worksheet can be an invaluable tool for understanding the concept of absolute value inequalities. This type of worksheet typically consists of a graph with a series of equations and inequalities involving absolute values. By plotting the equations and inequalities on the graph, students can gain a better understanding of the concept.
To use a graphing absolute value inequalities worksheet effectively, students should first identify the type of equation or inequality that is being presented. For example, if the equation is an absolute value inequality, it will be represented with a double-headed arrow. If it is an absolute value equation, it will be represented with a single-headed arrow. Once the type of equation or inequality has been identified, students should plot the equation or inequality on the graph.
Students should then identify the domain of the equation or inequality. This is the set of values for which the equation or inequality applies. For example, if the equation is an absolute value inequality, the domain would be all real numbers. If the equation is an absolute value equation, the domain would be all positive numbers.
[toc]
Once the domain of the equation or inequality has been identified, students should then assign values to the equation or inequality. This can be done easily by assigning values to each side of the equation or inequality. For example, if the inequality is written as x ≤ 10, students would assign the values of x to be anything less than or equal to 10.
After assigning values to the equation or inequality, students should then plot the points on the graph. This can be done by connecting the points with a line or by plotting the points on the graph individually. Once all of the points have been plotted, students should then identify the solution of the equation or inequality. This is the point on the graph where the equation or inequality is true.
By using a graphing absolute value inequalities worksheet, students can gain a better understanding of the concept. They can learn how to plot equations and inequalities, assign values, and identify solutions. This type of worksheet can be a helpful tool for those who are learning how to solve absolute value equations and inequalities.
Identifying Solutions to Graphing Absolute Value Inequalities with a Worksheet
Graphing absolute value inequalities can be a challenging concept to grasp. To help students better understand this concept, a worksheet can be a great tool. A worksheet should include practice problems that involve graphing absolute value inequalities.
The first step to creating a worksheet is to provide a thorough explanation of the concept. This should include a definition of absolute value and how it is used in graphing inequalities. It should also include an explanation of the steps necessary to graph an absolute value inequality.

Once the concept has been explained, students should be given practice problems to work through. These should vary in difficulty and complexity. For example, some problems should involve graphing a simple absolute value inequality, while others should involve graphing a more complex, multi-step inequality.
For each practice problem, students should be given the necessary tools to solve the problem. This may include a graph, a set of axes, and a set of instructions. The instructions should clearly explain the steps needed to graph the inequality.
Once students have completed the practice problems, they should be given a few questions to test their understanding of the concept. These questions should involve applying the concept to a new problem. This will help to reinforce the concept and ensure that students have a thorough understanding of the material.
By providing students with a worksheet that focuses on graphing absolute value inequalities, they can become more familiar with the concept and develop a better understanding of it. This will help them to become more confident when solving absolute value inequalities in the future.
Tips for Working Through a Graphing Absolute Value Inequalities Worksheet
1. Read the instructions carefully: Before attempting any problem on a graphing absolute value inequalities worksheet, it is important to read the instructions carefully so you understand the requirements of the task. Make sure you understand the question and what is expected of you before attempting to answer it.
2. Gather the necessary information: Before you can graph the absolute value inequality, you need to know the equation, the domain, and the range. Gather the information necessary to complete the task before starting.
3. Plot the points: Next, plot the points given in the equation on a graph. Be sure to label the axes and the points accurately.
4. Connect the points: Connect the points on the graph with a line. This line will represent the boundary of the absolute value inequality.
5. Determine the solutions: Finally, determine the solutions to the inequality. This can be done by examining the points and lines on the graph and determining if they fall above or below the line. If they fall above the line, the solution is true, and if they fall below the line, the solution is false.
By following these steps, you should be able to work through a graphing absolute value inequalities worksheet successfully.
Exploring the Relationship Between Graphs and Solutions to Graphing Absolute Value Inequalities with a Worksheet
Graphing absolute value inequalities can be a difficult concept to grasp. To help students better understand this concept, a worksheet can be used to explore the relationship between graphs and solutions to graphing absolute value inequalities.
This worksheet begins by defining absolute value inequalities and providing an example. It then provides a few practice problems for the student to work through, demonstrating the different steps to solving and graphing the inequality.
The worksheet then introduces the concept of “shifting” the graph. This is done to represent the inequality in terms of the solution set. It is important to note that when graphing an absolute value inequality, the graph should not be shifted in the direction of the inequality symbol, but rather, shifted in the opposite direction. This worksheet provides a few examples of this concept, to help reinforce its understanding.
In addition, the worksheet provides visual representations of the solution set, including examples of both closed and open intervals. This helps the student to better understand the solution set and the relationship between the graph and the solution set.
Finally, the worksheet includes a few practice problems for the student to complete. This helps the student to apply the concepts that were discussed in the worksheet in a practical way.
In sum, this worksheet provides a helpful and comprehensive way to explore the relationship between graphs and solutions to graphing absolute value inequalities. It helps the student understand the concept of shifting the graph and provides visual representations of the solution set. Through this worksheet, the student can gain an in-depth understanding of this important concept.
Conclusion
The Graphing Absolute Value Inequalities Worksheet is a great tool for students to practice solving and graphing absolute value inequalities. It allows students to gain a better understanding of the properties of absolute value, and the use of the graphing tool to visualize the solutions. With the knowledge gained from this worksheet, students can create better-informed decisions and solve more complex equations.
[addtoany]
5 photos of the "Graphing Absolute Value Inequalities Worksheet"
Related posts of "Graphing Absolute Value Inequalities Worksheet"
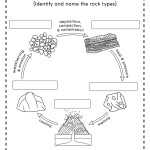
Rock Cycle Worksheet Middle School
How to Use a Rock Cycle Worksheet in Middle School Science ClassUsing a rock cycle worksheet in a middle school science classroom is an effective way to help students gain a better understanding of the rock cycle and the processes that shape the Earth’s surface. The rock cycle is an important concept for students to...
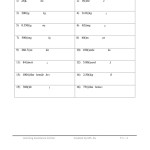
Unit Conversion Worksheet Chemistry
How to Use Unit Conversion Worksheet Chemistry to Make Metric Conversions EasierUnit conversion worksheets are an invaluable tool for those studying or working in chemistry or related sciences, as they allow for quick and easy conversion of measurements between metric and imperial systems. This can be especially useful when dealing with complex formulas and calculations,...
Energy Flow Worksheet Answers
Exploring the Benefits of Utilizing an Energy Flow Worksheet to Enhance Your Understanding of the EnvironmentAn energy flow worksheet is an invaluable tool for anyone who seeks to better understand the environment in which they live. By accurately recording and tracking the flow of energy through a given system, it allows for a better understanding...
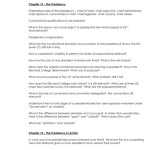
The Executive Branch Worksheet
An Overview of the Executive Branch Worksheet: Understanding the Roles and Responsibilities of the President and CabinetThe executive branch of the United States government is comprised of the President and the Cabinet. It is the President’s responsibility to ensure that the laws of the United States are faithfully executed and to direct the foreign and...