Analyzing Free Body Diagram Worksheet Answers: A Step-by-Step Guide
Step 1: Understand the Free Body Diagram
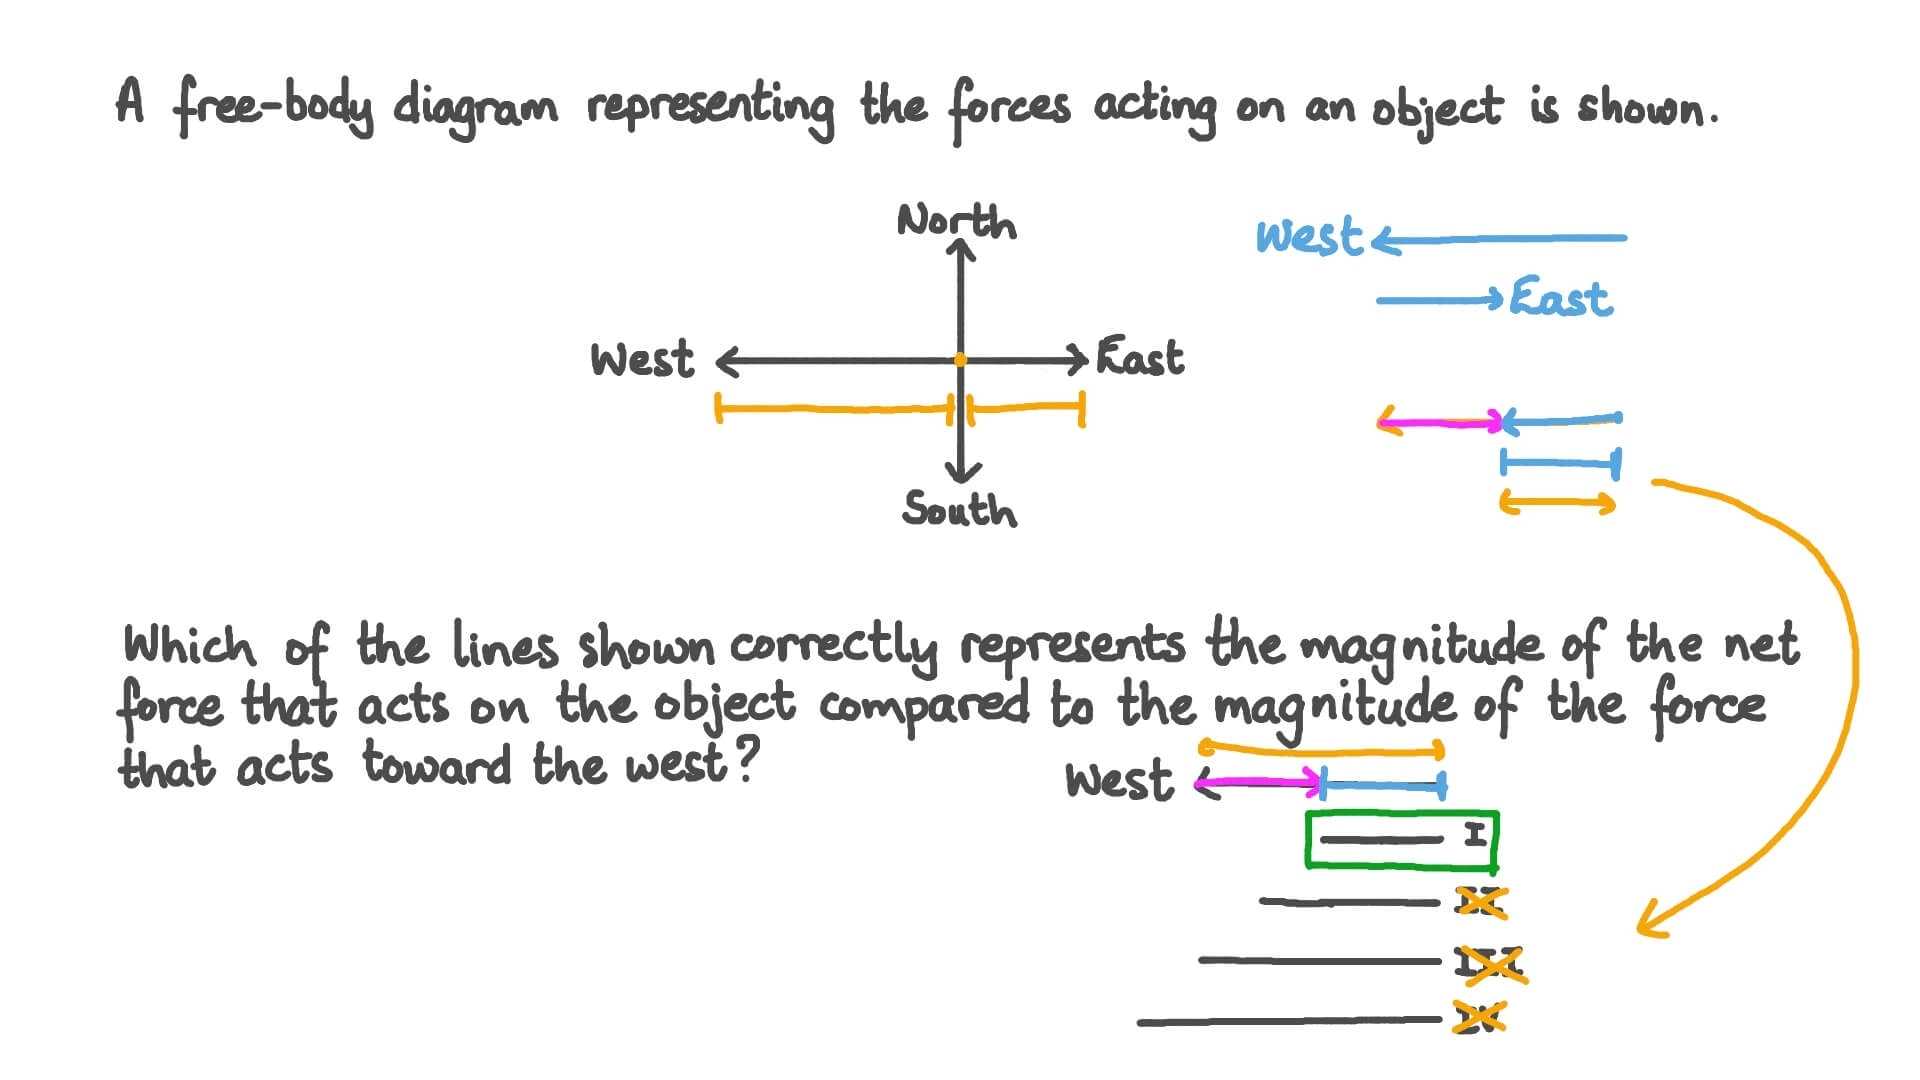
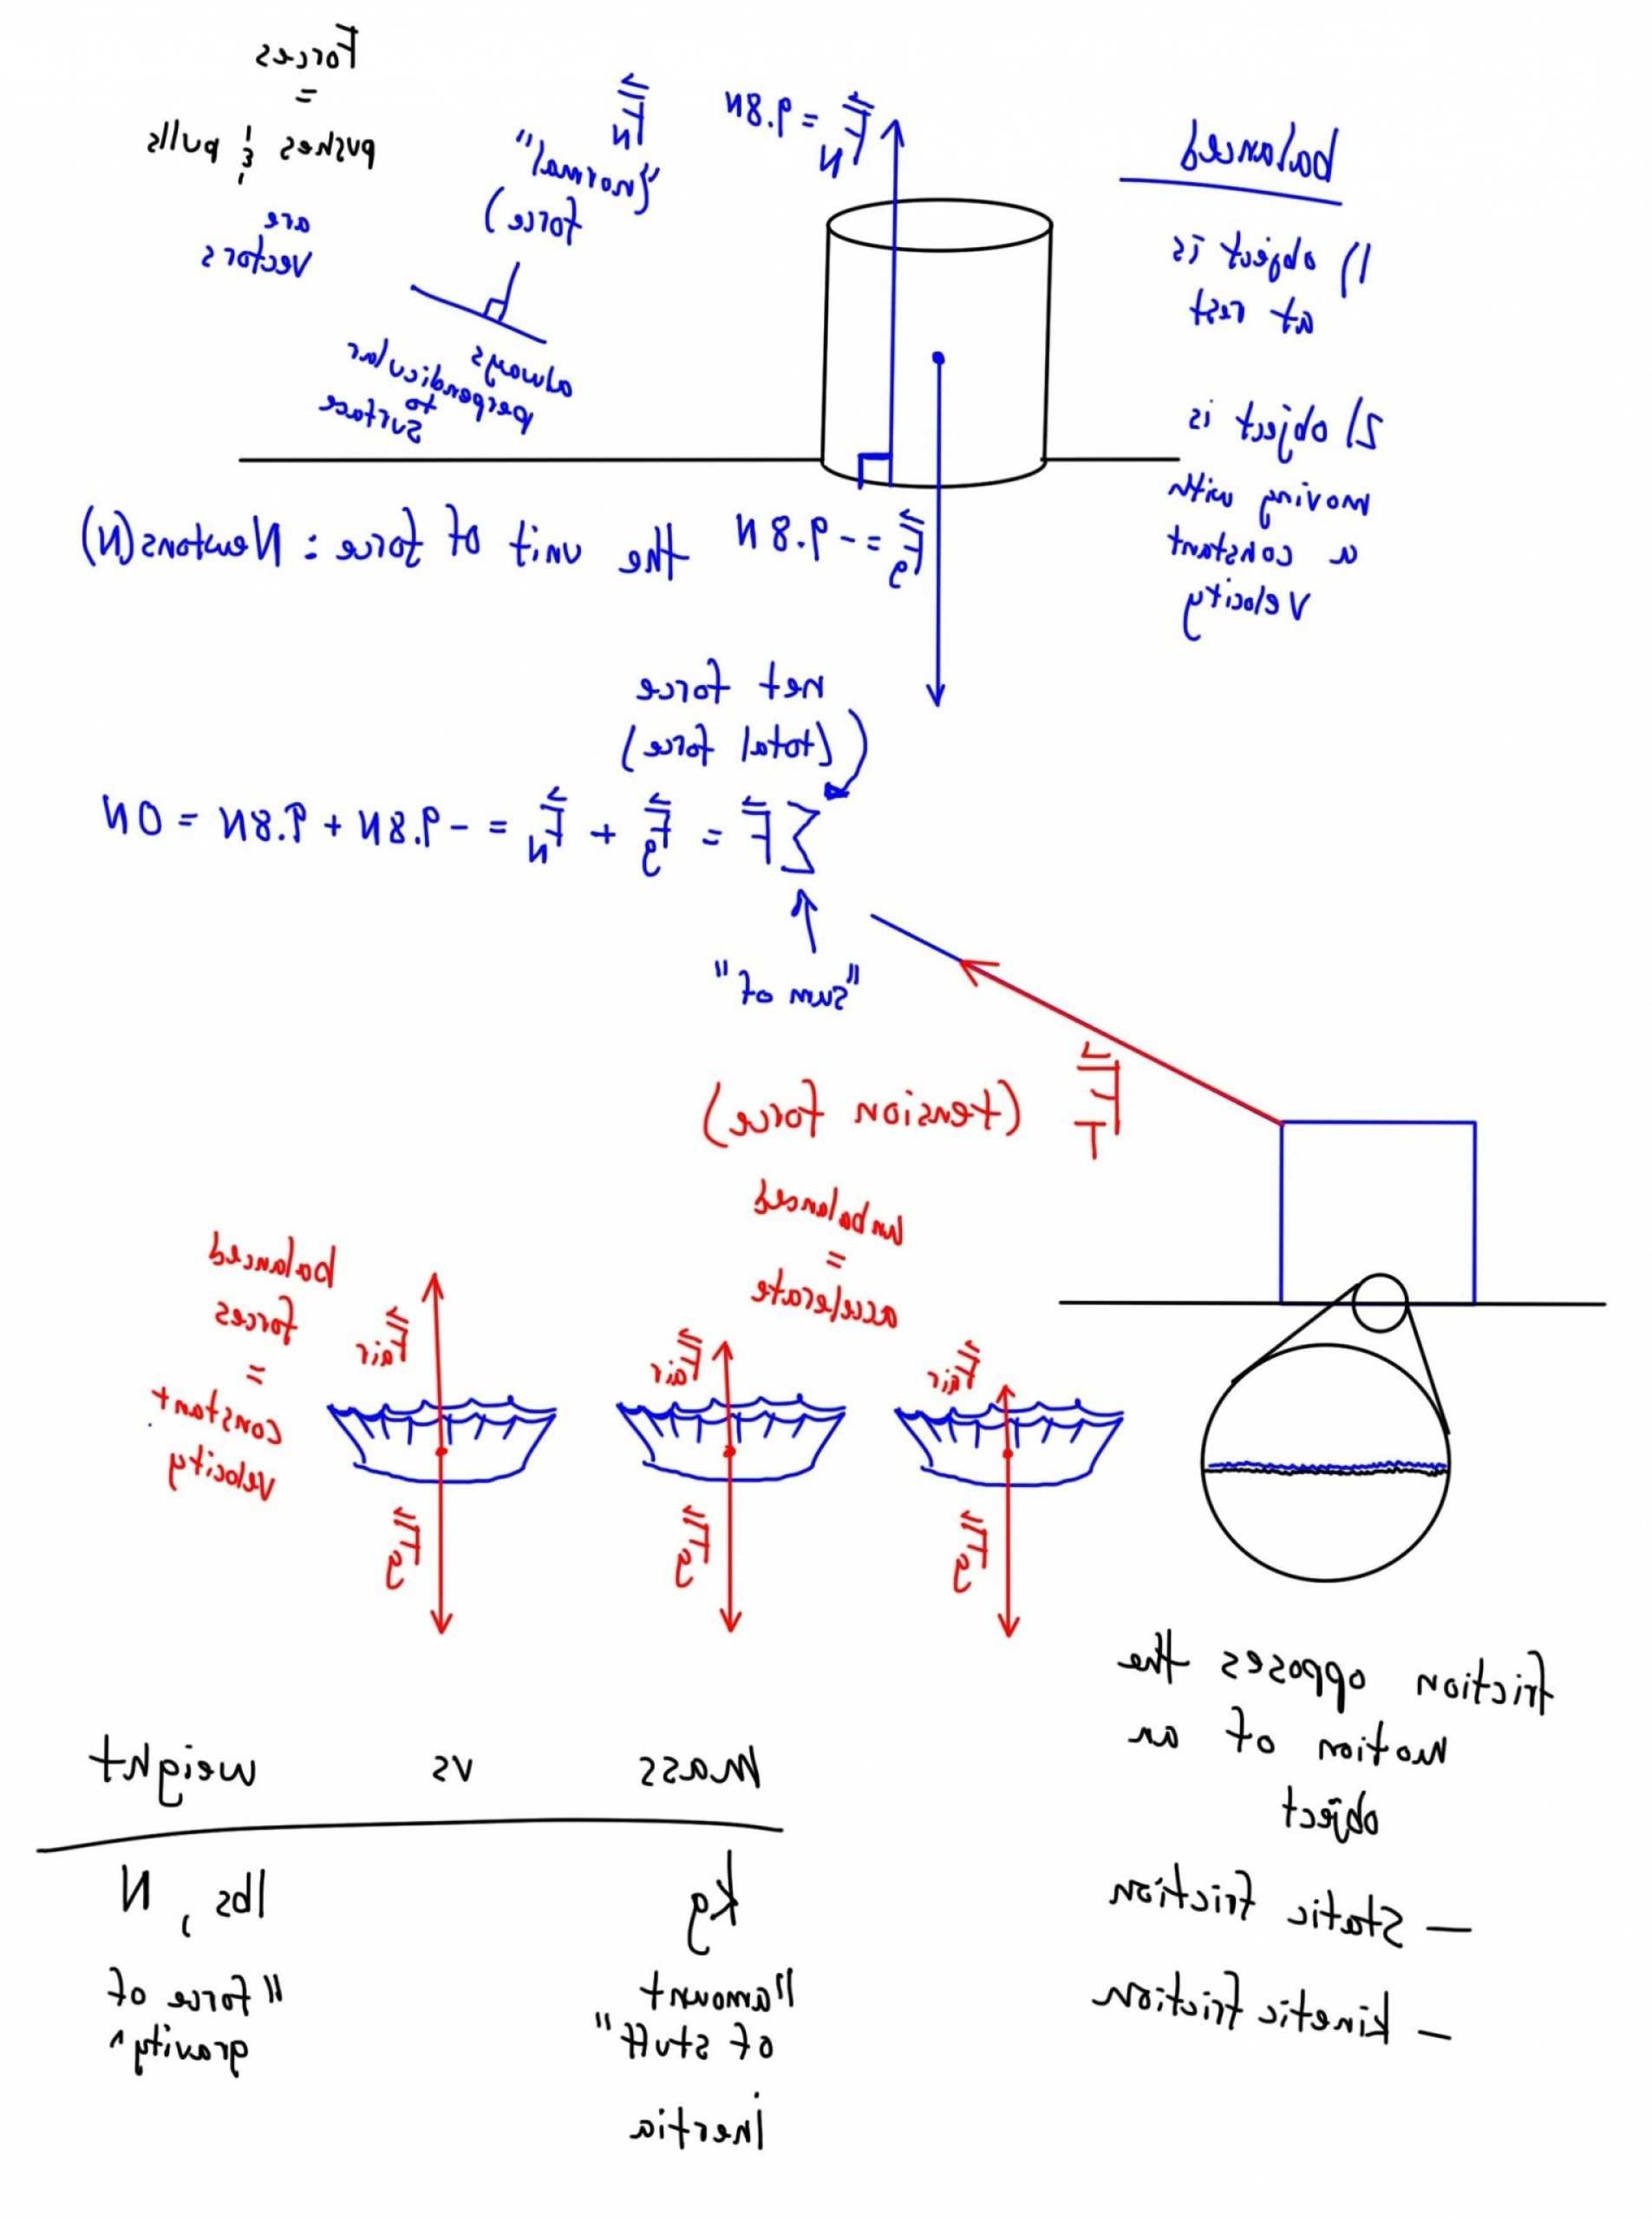
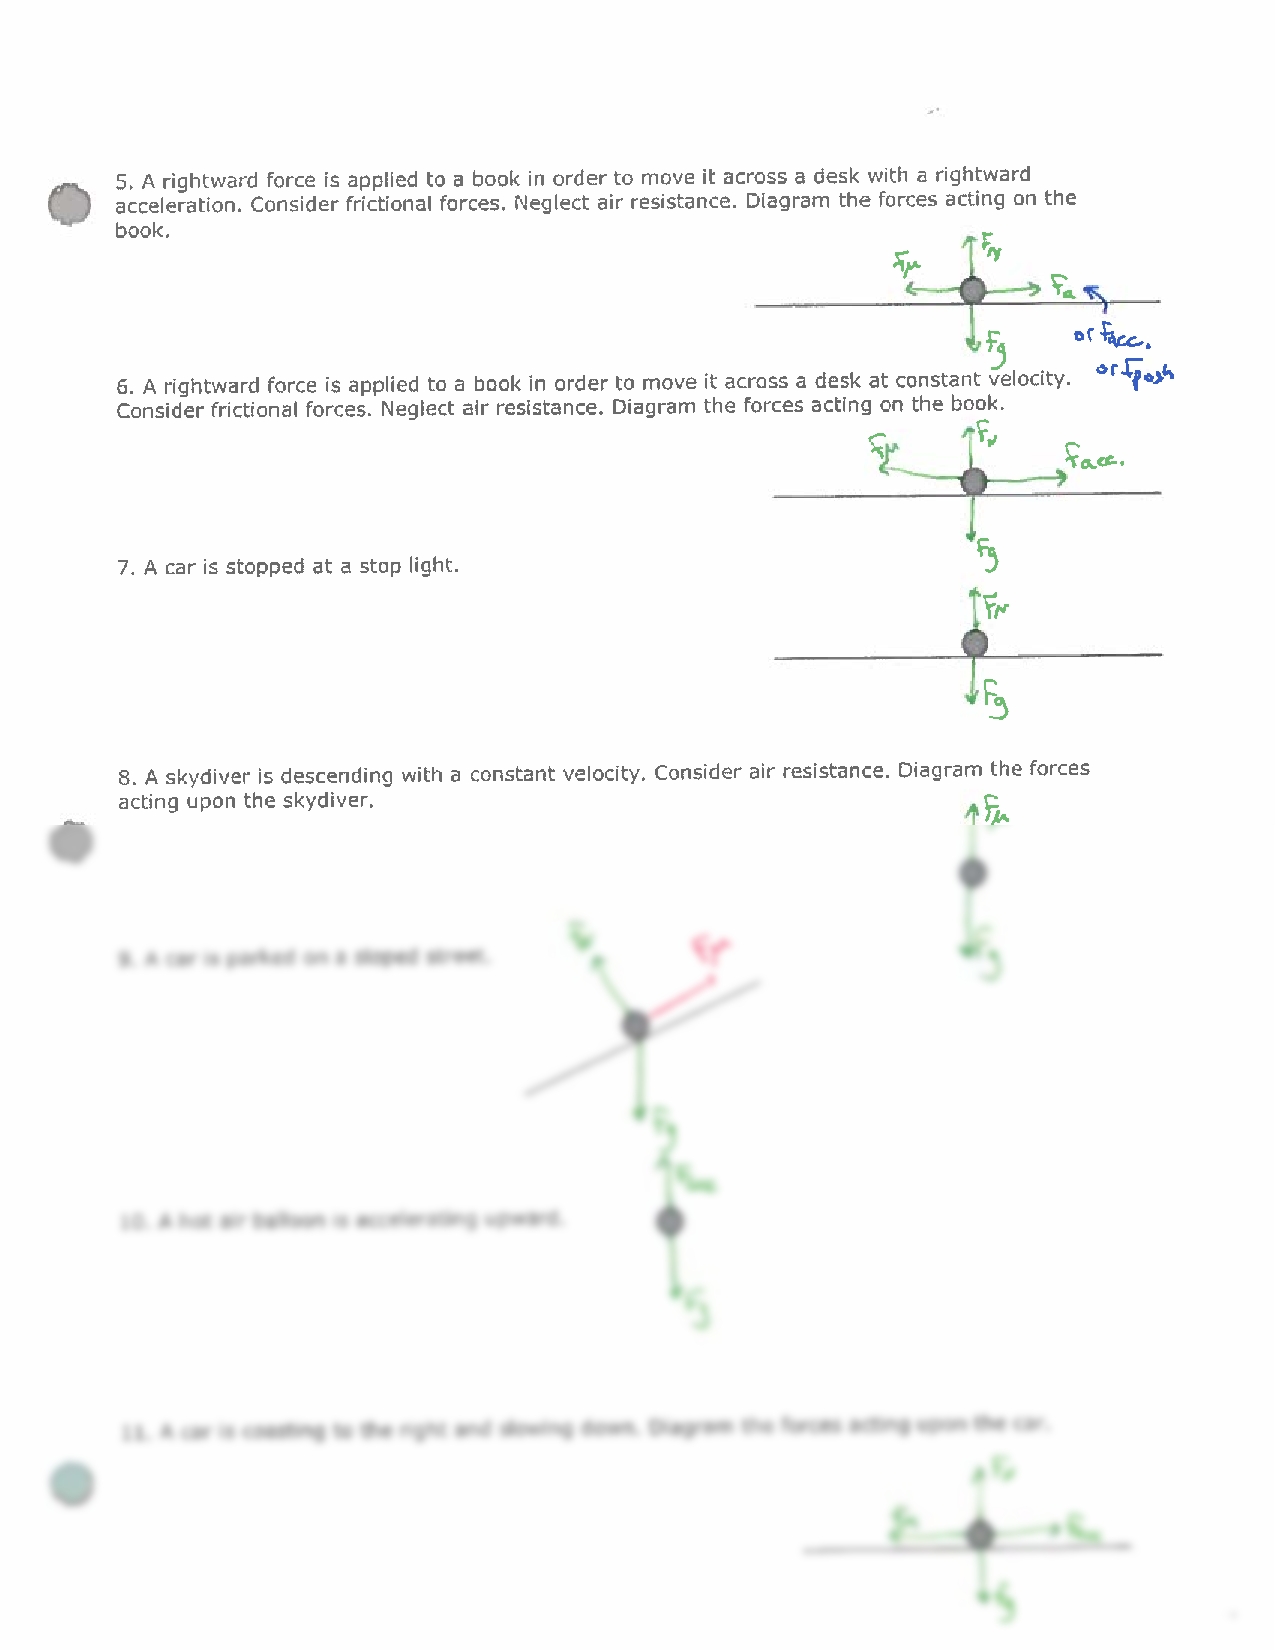
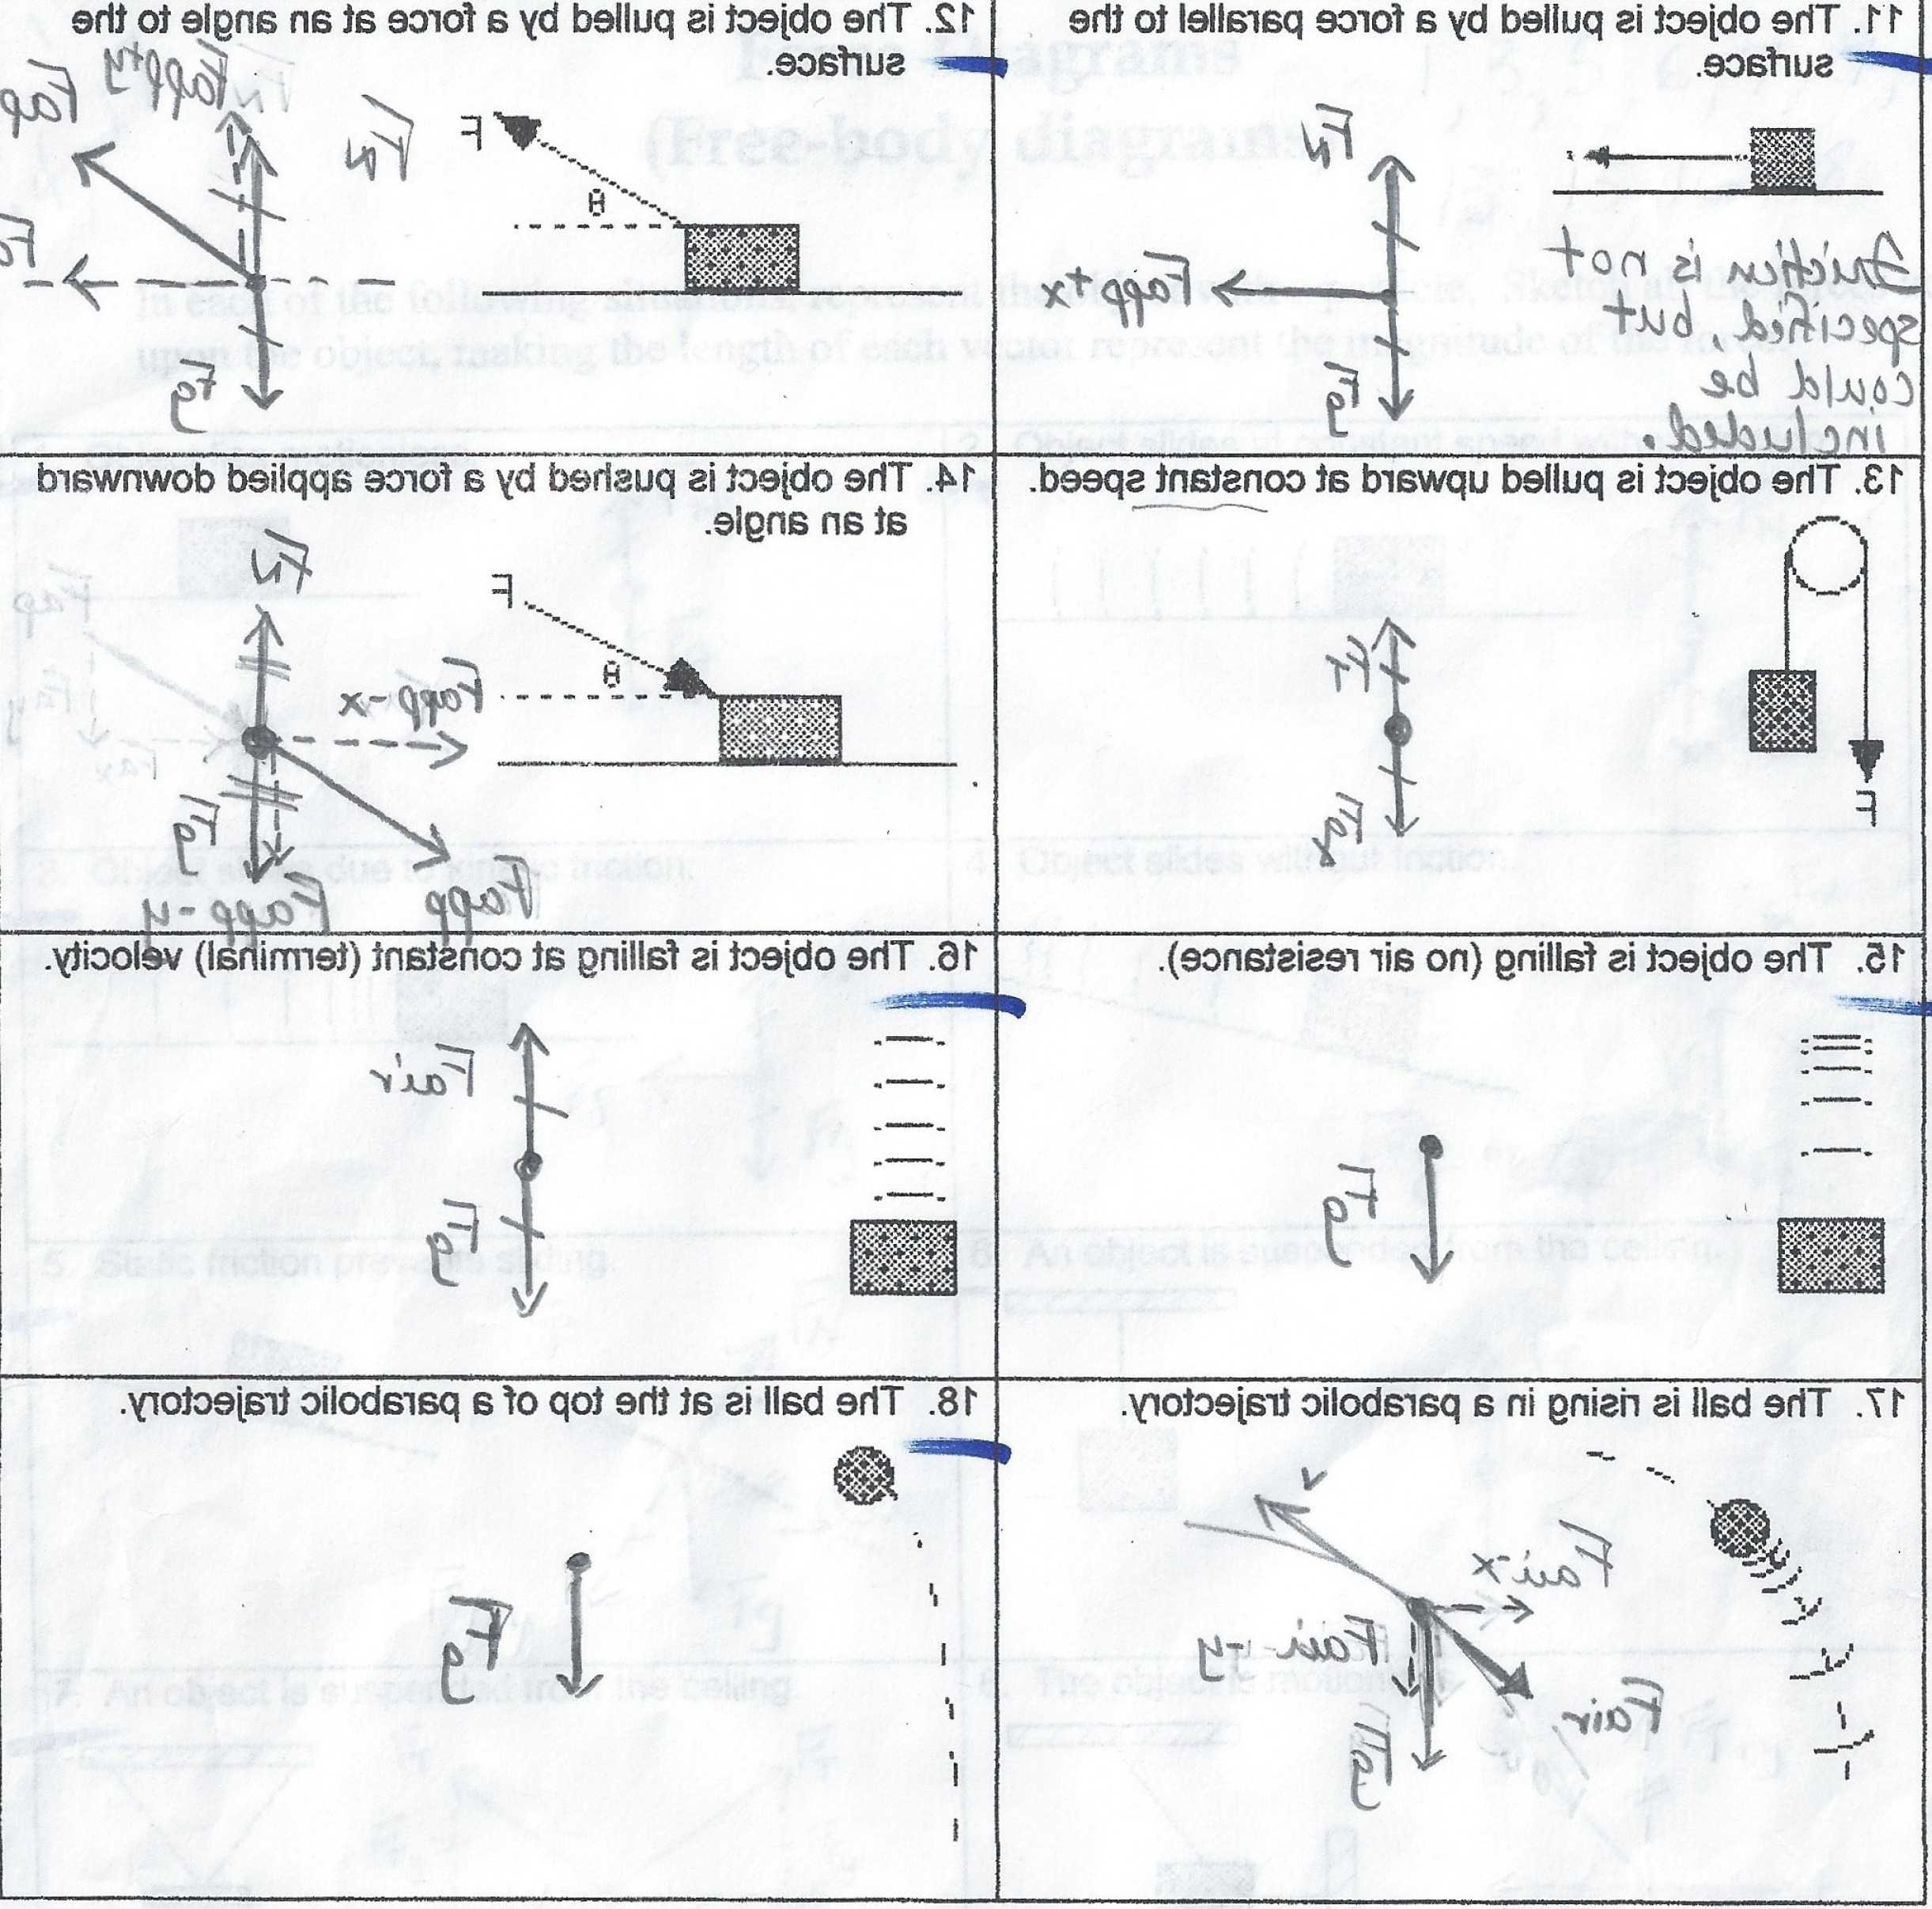
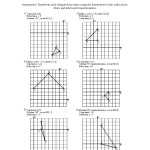
A Free Body Diagram (FBD) is a drawing used to represent the forces acting on an object. It consists of a simple sketch of the object, with arrows indicating the direction and magnitude of the force on the object. The FBD helps to illustrate the forces at work and the resultant motion that occurs when the forces are applied.
Step 2: Identify the Forces
The first step in analyzing a Free Body Diagram is to identify the forces acting on the object. This includes the contact forces, such as friction, normal force, and applied force, as well as non-contact forces, such as gravity and air resistance. Once the forces are identified, it is important to label each one in the FBD.
Step 3: Calculate the Net Force
Once the forces have been identified and labeled, the next step is to calculate the net force acting on the object. To do this, simply add up all of the individual forces in the FBD. The net force is the sum of the forces in the same direction, minus the sum of the forces in the opposite direction.
[toc]
Step 4: Analyze the Results
The final step in analyzing a Free Body Diagram is to analyze the results. This includes calculating the acceleration, velocity, and displacement of the object. The acceleration is calculated by dividing the net force by the mass of the object. The velocity and displacement are then calculated by solving the equations of motion.
By following these steps, you can easily analyze a Free Body Diagram Worksheet and understand the forces at work. With this knowledge, you can then make predictions about the motion of an object and its behavior in different situations.
How to Use Free Body Diagram Worksheet Answers to Solve Physics Problems
A free body diagram worksheet is a useful tool for solving physics problems. It helps to visually represent the forces at work on an object and helps to simplify the calculations required to solve the problem. In order to effectively use a free body diagram worksheet to solve physics problems, the following steps should be followed.
First, draw a free body diagram to represent the physical system being studied. The free body diagram should include all of the forces acting on the object and their directions. Be sure to label each force clearly to avoid confusion.
Next, calculate the net force on the object by summing up the individual forces. This can be done by multiplying each force by its respective direction and adding the resulting vectors.

Once the net force is known, calculate the object’s acceleration by dividing the net force by the object’s mass. The acceleration can then be used to calculate the object’s displacement and velocity.
Finally, use the displacement and velocity to determine the object’s position at any given moment. With this information, it is possible to solve for the object’s position and velocity at any given time.
Using a free body diagram worksheet is an effective way to solve physics problems. By following the above steps, students can use the diagrams to visualize the forces at work on an object and accurately calculate the object’s position and velocity.
Exploring the Benefits of Using Free Body Diagram Worksheet Answers in Physics Education
Physics education is an essential part of the learning process, providing students with the understanding of the fundamental laws of nature and the principles of mechanics. As such, effective teaching methods are needed to ensure that students can adequately understand the concepts behind physics. One such teaching approach is the use of free body diagrams (FBDs) worksheets with answers.
FBDs are diagrams that depict the forces acting on an object in a given situation. By understanding the forces acting on the object, students can be better equipped to comprehend the physics that is being discussed. FBDs can be used to illustrate various types of problems, including those involving equilibrium, momentum, energy, and angular momentum.
Using FBD worksheets with answers can help to simplify the teaching process by providing students with a visual representation of the forces acting on the object in a given situation. This visual representation can then be used to lead students through a logical process of reasoning to help them understand the physics behind the scene. FBD worksheets also enable teachers to assess the students’ understanding of the problem by the answers provided.
The use of FBD worksheets with answers can also help to improve the students’ problem-solving skills. By understanding the forces acting on the object, students can learn to recognize patterns and apply their knowledge of the physics concepts to solve problems. This type of learning encourages students to think critically and develop problem-solving skills that can be applied to other areas of physics.
In addition to the educational benefits, FBD worksheets with answers can provide students with an opportunity to practice and refine their problem-solving skills. This type of practice can help to prepare students for exams and give them the confidence they need to succeed in the classroom.
Overall, the use of FBD worksheets with answers can offer numerous benefits to physics education. By providing a visual representation of the forces acting on an object, students can better understand the physics being discussed. Additionally, this type of worksheet can help to improve students’ problem-solving skills and help them to prepare for exams. Thus, FBD worksheets with answers can be an effective tool for teaching physics.
Conclusion
The Free Body Diagram Worksheet Answers provides an excellent tool to help students understand the basic principles of force and motion. By completing the worksheet, students will gain a better understanding of how forces interact with objects and how to draw a free body diagram. This will help them in solving problems related to force and motion and in their future studies in science and engineering.
[addtoany]
5 photos of the "Free Body Diagram Worksheet Answers"
Related posts of "Free Body Diagram Worksheet Answers"
Translation Rotation Reflection Worksheet
How to Use a Translation Rotation Reflection Worksheet to Teach GeometryGeometry is a subject that can be difficult for students to understand and comprehend. However, using a translation, rotation, and reflection worksheet can be an effective tool for helping students learn and apply the concepts of geometry. A translation, rotation, and reflection worksheet is a...

Slope Word Problems Worksheet
How to Use a Slope Word Problems Worksheet to Improve Your Math SkillsUsing a slope word problems worksheet can be a great way to improve your math skills. A slope word problems worksheet is a worksheet that gives you various types of problems based on slope. It can help you to practice and understand the...
Commonly Misspelled Words Worksheet
How to Use a Commonly Misspelled Words Worksheet to Improve Your Spelling Improving your spelling can be an arduous task, but using a commonly misspelled words worksheet can make the process much more manageable. A commonly misspelled words worksheet is a great tool for improving spelling accuracy, as it provides a convenient way to look...
Position Time Graph Worksheet
How to Use Position Time Graph Worksheets to Easily Teach PhysicsPosition time graph worksheets can be an invaluable tool for teaching physics. By providing an easy-to-understand visual representation of motion and its various components, these worksheets can help students learn and understand the principles of physics more effectively. Position time graph worksheets typically consist of...