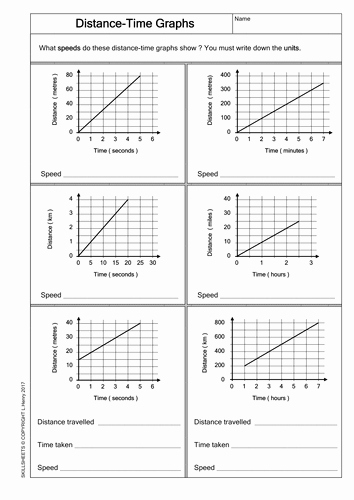
How to Create a Distance vs Time Graph Worksheet for Students
Creating a Distance vs Time Graph Worksheet for students can be an effective way to help them understand the relationship between distance and time. Through this worksheet, students will learn to interpret a graph, calculate rates of change, and compare data.
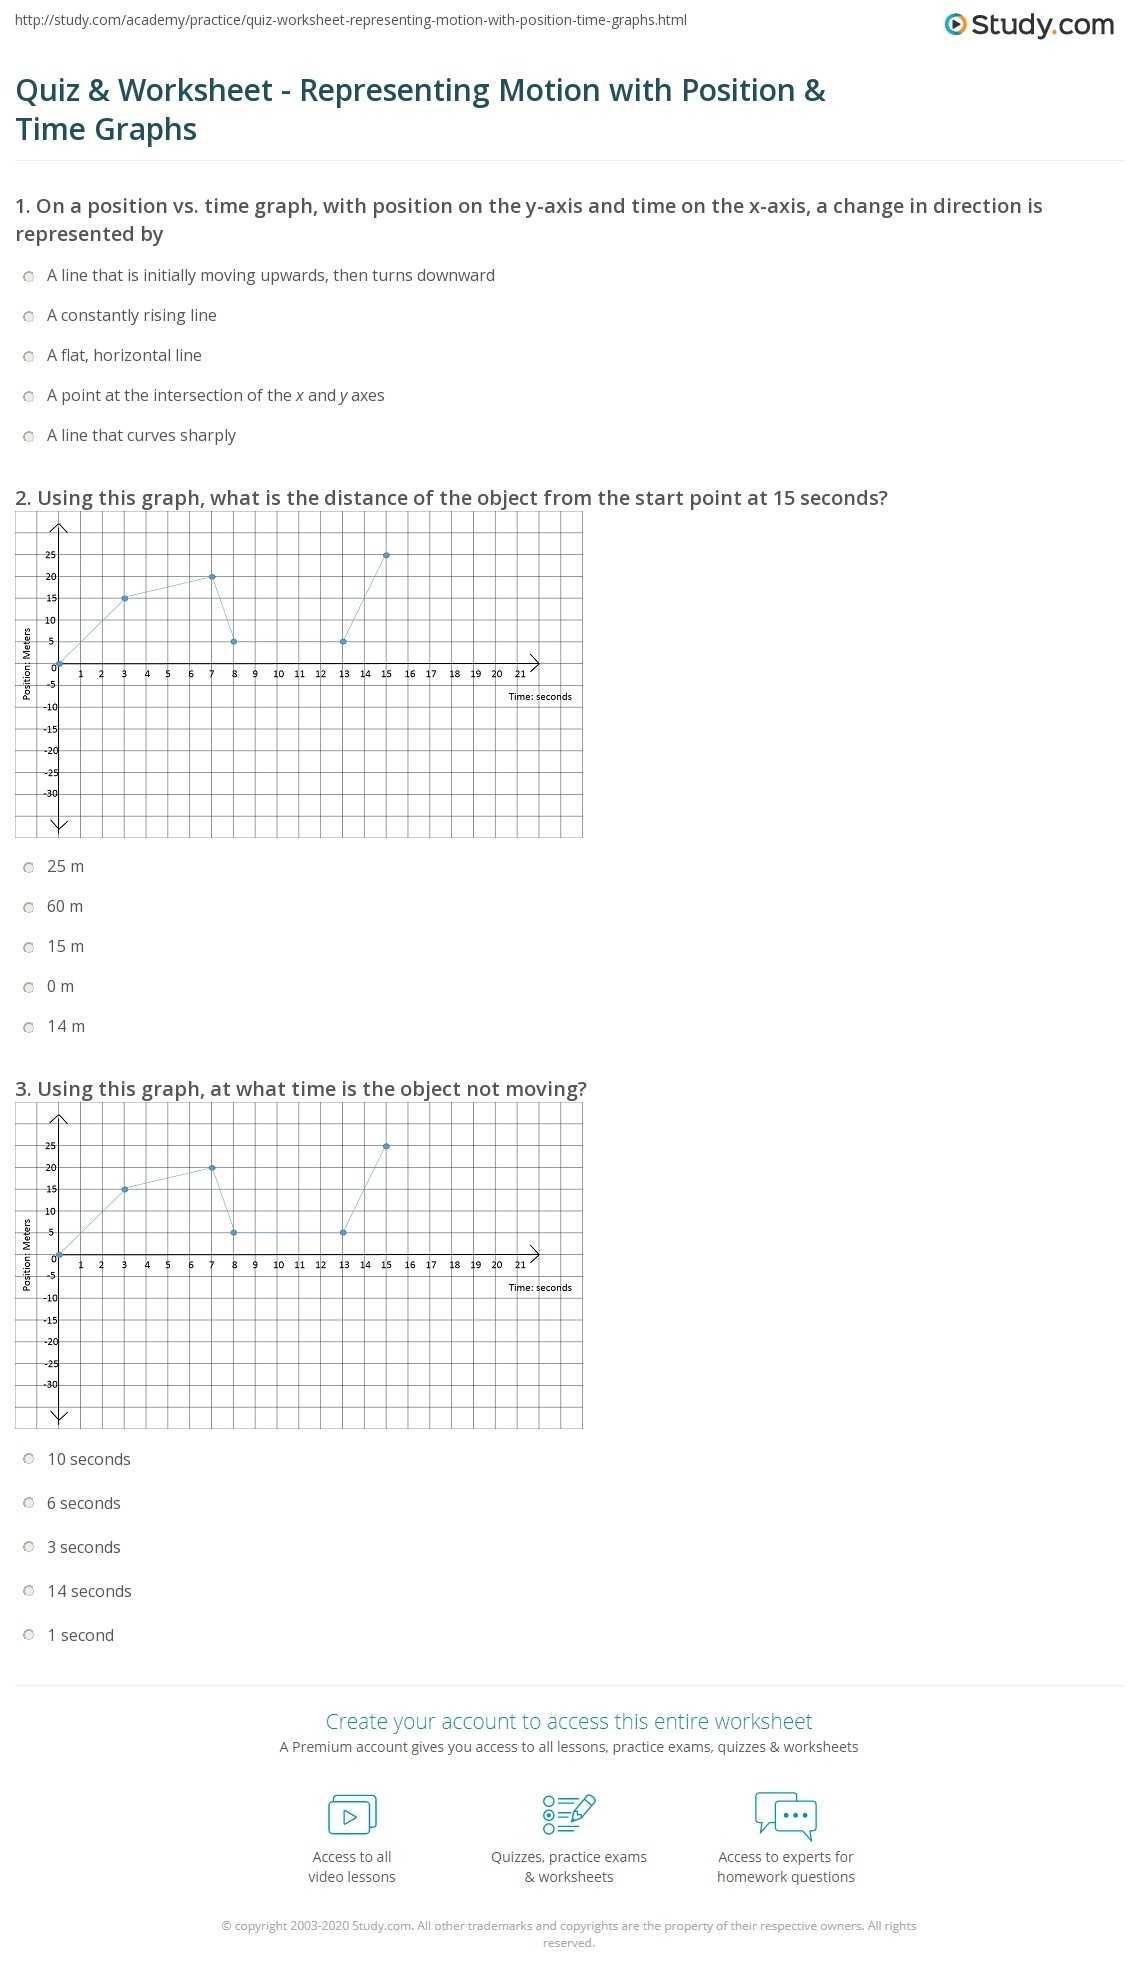
To start, begin by gathering the necessary materials. This includes graph paper, graph templates, rulers, and pencils. Once you have the materials, you will need to construct the worksheet.

First, draw a graph onto the paper. Mark the x-axis, which will represent time, and the y-axis, which will represent distance. Label each axis accordingly. Next, provide the students with a set of data points, which can be found in a chart or table. This set of data points should include the time, in minutes, and the distance, in meters.
[toc]
Once the data points have been provided, the students should plot them on the graph. They should connect each point with a line to create a line graph. This will represent the data points and the relationship between time and distance.
Once the graph is complete, the students should use the graph to answer questions about the data. Questions may include calculating the rate of change between any two of the data points, or finding the total distance traveled.
After the students have answered the questions, have them summarize the data in their own words. This may include talking about the slope of the line, the total distance traveled, or any other observations they may have made.
Creating a Distance vs Time Graph Worksheet for students is a great way to help them learn to interpret graphs and calculate rates of change. By providing them with the necessary materials and data, they can construct the graph and answer questions related to the data. This worksheet can be an effective teaching tool for helping students understand this important concept.
Analyzing Distance vs Time Graphs – Tips and Strategies for Students
Analyzing distance vs time graphs is an important skill for students to master. It can help them understand concepts in physics, mathematics, and other science-related courses. To become proficient in analyzing such graphs, students should employ certain tips and strategies.
First and foremost, students should understand the basic structure of a distance vs time graph. This graph consists of two axes, the horizontal one representing time and the vertical one representing distance. The graph will also have a line which connects a series of data points. This line is known as the line of best fit and it is used to represent the relationship between distance and time.
Once students have a basic understanding of the graph, they should pay close attention to the data points. By doing so, they can identify patterns and trends in the data. For example, students can identify the slope of the line of best fit, which can tell them the rate at which the distance is changing over time.
In addition to data points, students should also look for anomalies in the graph. Anomalies are points which do not seem to fit with the general trend of the data. Anomalies can provide valuable insight into the relationship between distance and time.
Finally, students should be able to identify the different types of motion represented in the graph. Some graphs may represent uniform motion, while others may represent non-uniform motion. By understanding the type of motion in the graph, students can better interpret the data and draw conclusions about the relationship between distance and time.
By following these tips and strategies, students can improve their ability to analyze distance vs time graphs. With practice and patience, they can become proficient in interpreting these graphs and applying their knowledge to various scientific topics.
Using Distance vs Time Graphs to Understand the Relationship Between Distance and Time
Distance and time are two fundamental concepts in physics and mathematics. They are closely related to one another, and their relationship can be understood through the use of distance versus time graphs. Such a graph is a two-dimensional representation of the movement of an object over a period of time. The x-axis of the graph represents time, and the y-axis represents the distance the object has traveled.
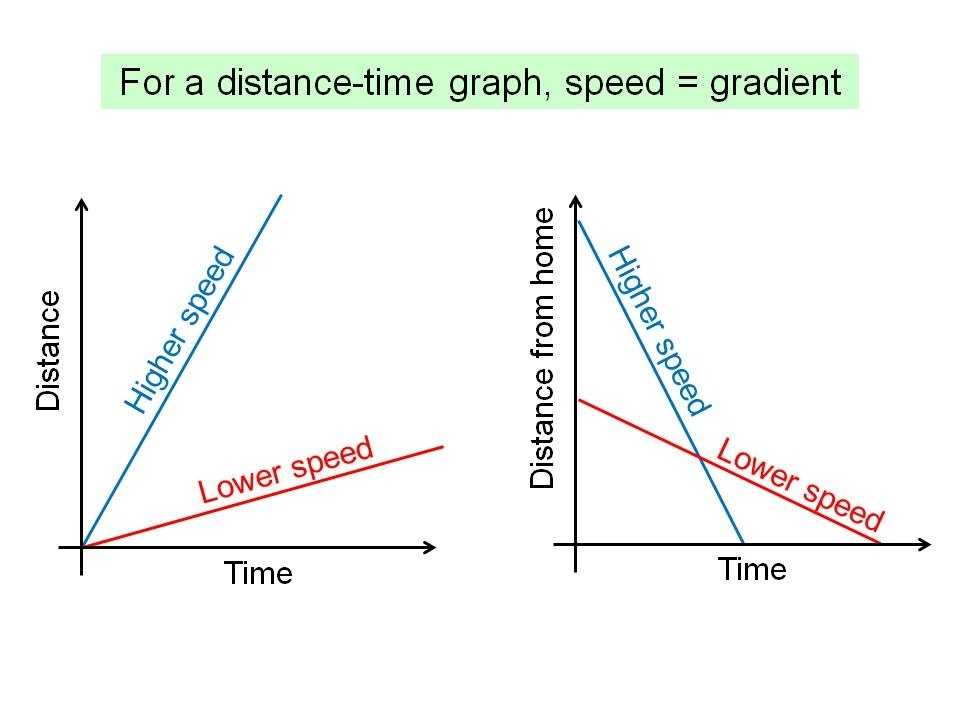
By plotting points on the graph, the relationship between distance and time can be seen. As the object moves, it will move a certain distance in a certain amount of time. This can be represented by a straight line on the graph. If the object increases its speed, the line will become steeper; if the object decreases its speed, the line will become shallower. The slope of the line is determined by the speed of the object, and the steeper the line, the faster it is moving.
The graph can also be used to determine a wide range of information about the object, such as its average speed, its maximum speed, and its acceleration. The average speed of the object can be found by dividing the total distance traveled by the total time taken. The maximum speed can be found by looking for the point on the graph where the line is steepest. The acceleration can be determined by measuring the rate of change of the slope of the line.
In this way, distance versus time graphs can be used to gain a better understanding of the relationship between distance and time. They can be used to determine the speed of an object, as well as its acceleration, and can provide insight into the movement of an object over time.
Exploring the Relationship Between Distance and Time Through Distance vs Time Graphs
Distance vs time graphs are a powerful tool used to study the relationship between distance and time. They are used to represent the motion of an object and are used to determine the speed of the object. A distance vs time graph is a visual representation of the relationship between two variables, distance and time. The x-axis of the graph represents the time, and the y-axis represents the distance travelled.
The slope of the line on a distance vs time graph represents the speed of an object. The steeper the line, the faster the object is moving. A horizontal line indicates that the object is not moving, and a curved line indicates that the object is accelerating. The area under the line on a distance vs time graph also represents the distance travelled by the object.
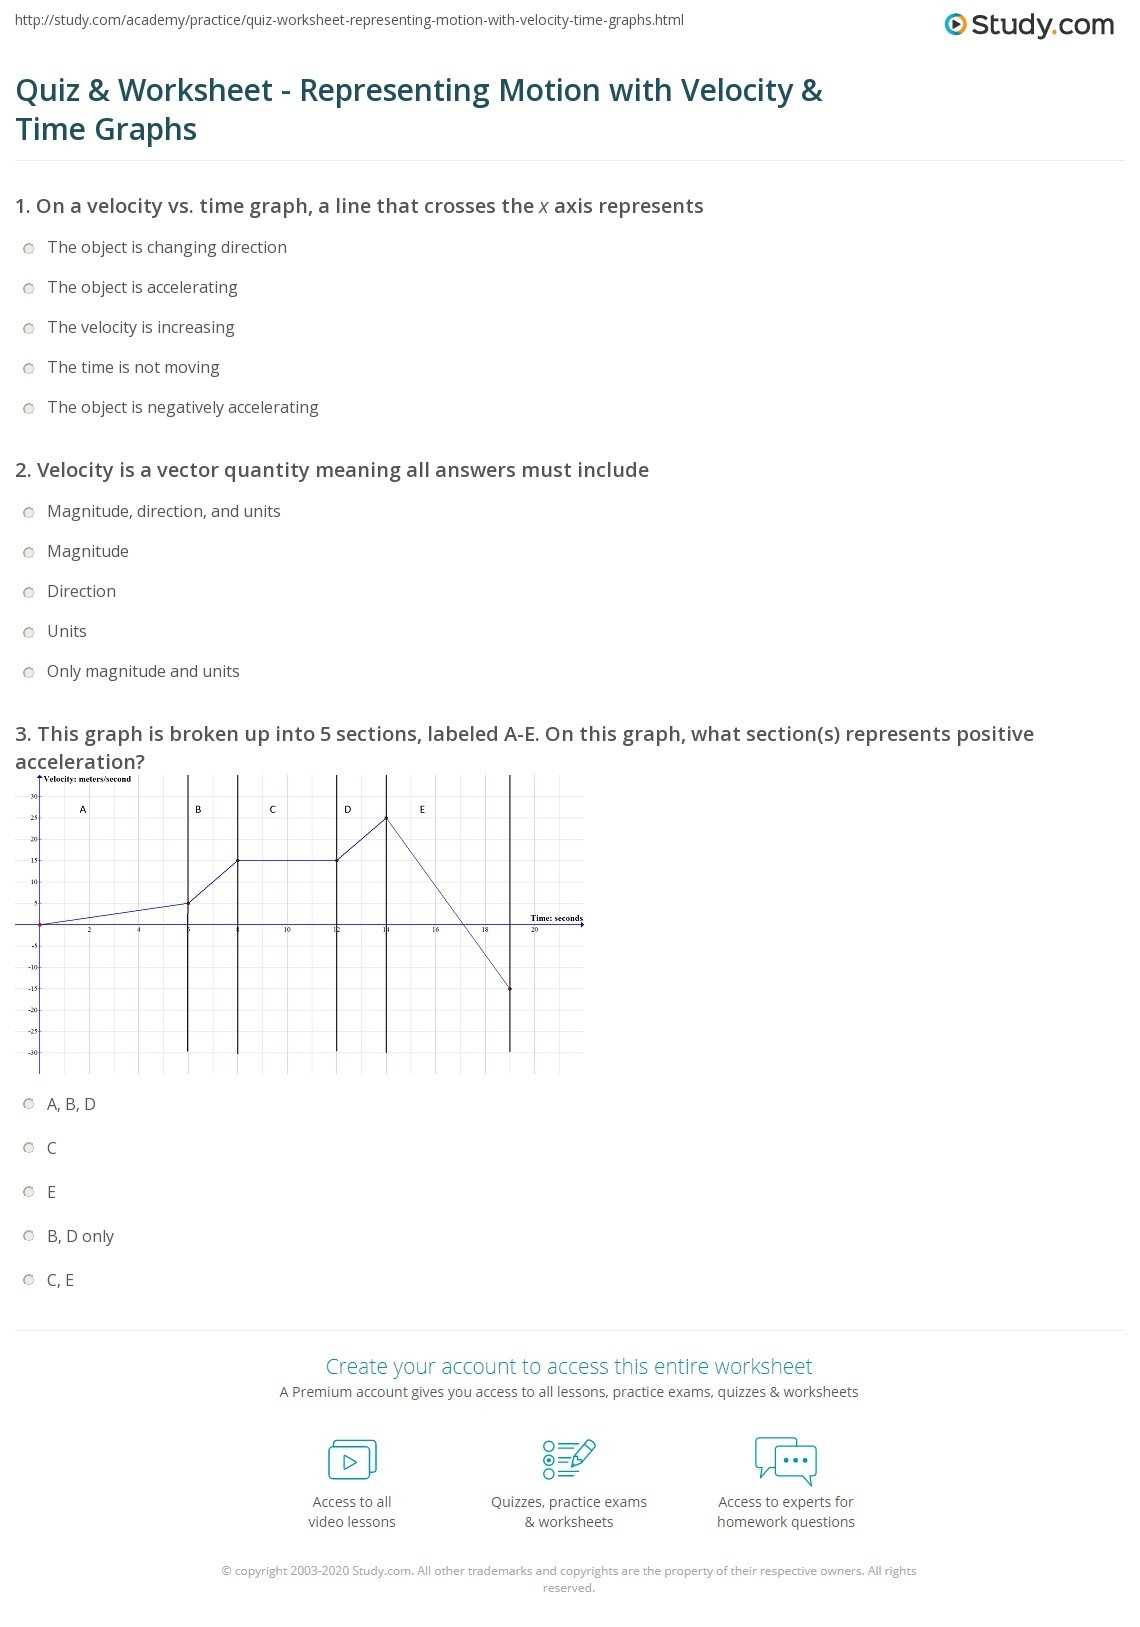
The relationship between distance and time can be explored further by looking at a graph that has both distance and time on the same graph. This type of graph is known as a velocity vs time graph. The x-axis represents time, and the y-axis represents velocity. The slope of the line on this graph represents the acceleration of the object. It is also possible to use a velocity vs time graph to determine the distance travelled by an object.
Distance vs time graphs are a useful tool for studying the relationship between distance and time. They provide a visual representation of the motion of an object and allow us to determine the speed, acceleration, and distance travelled by an object. By looking at the graph, it is possible to explore the relationship between distance and time and make predictions about the motion of the object.
Conclusion
The Distance vs Time Graph Worksheet is a useful tool for helping students understand the relationship between distance and time. It can help students visualize the relationship and understand how to use the equation of motion to calculate the distance traveled over a given time. Additionally, it can be used to help students understand the implications of changing the rate of speed and the effect it has on the total distance traveled. Overall, the worksheet is a great tool for teaching students about the relationship between distance and time.
[addtoany]
5 photos of the "Distance Vs Time Graph Worksheet"
Related posts of "Distance Vs Time Graph Worksheet"

Respiratory System Worksheet Pdf
How to Use a Respiratory System Worksheet Pdf to Enhance Your Understanding of Respiratory AnatomyA respiratory system worksheet pdf is an excellent resource for enhancing one's understanding of respiratory anatomy. These documents provide detailed information about the structure and function of the respiratory system. By studying a worksheet pdf, one can gain a better understanding...

Simplifying Rational Exponents Worksheet
How to Easily Master Simplifying Rational Exponents with a Worksheet Simplifying rational exponents can be a daunting task, especially for students who are new to the subject. However, with a bit of practice, the process can be mastered with ease. One of the best ways to do this is by completing a worksheet. A worksheet...
Skills Worksheet Active Reading
Unlocking the Power of Active Reading: How to Maximize Your Learning with Skills Worksheet Active ReadingActive reading is a powerful tool for maximizing learning and comprehension. By engaging with the material and using the skills of active reading, readers can extract more meaning from what they read and increase their understanding of the material. To...
Triangle Angle Sum Worksheet
Exploring the Basics of the Triangle Angle Sum Theorem The Triangle Angle Sum Theorem is a fundamental mathematical theorem which states that the sum of the angles in any triangle is equal to 180 degrees. This theorem is an important tool for many everyday applications, such as surveying and construction, as well as for more...