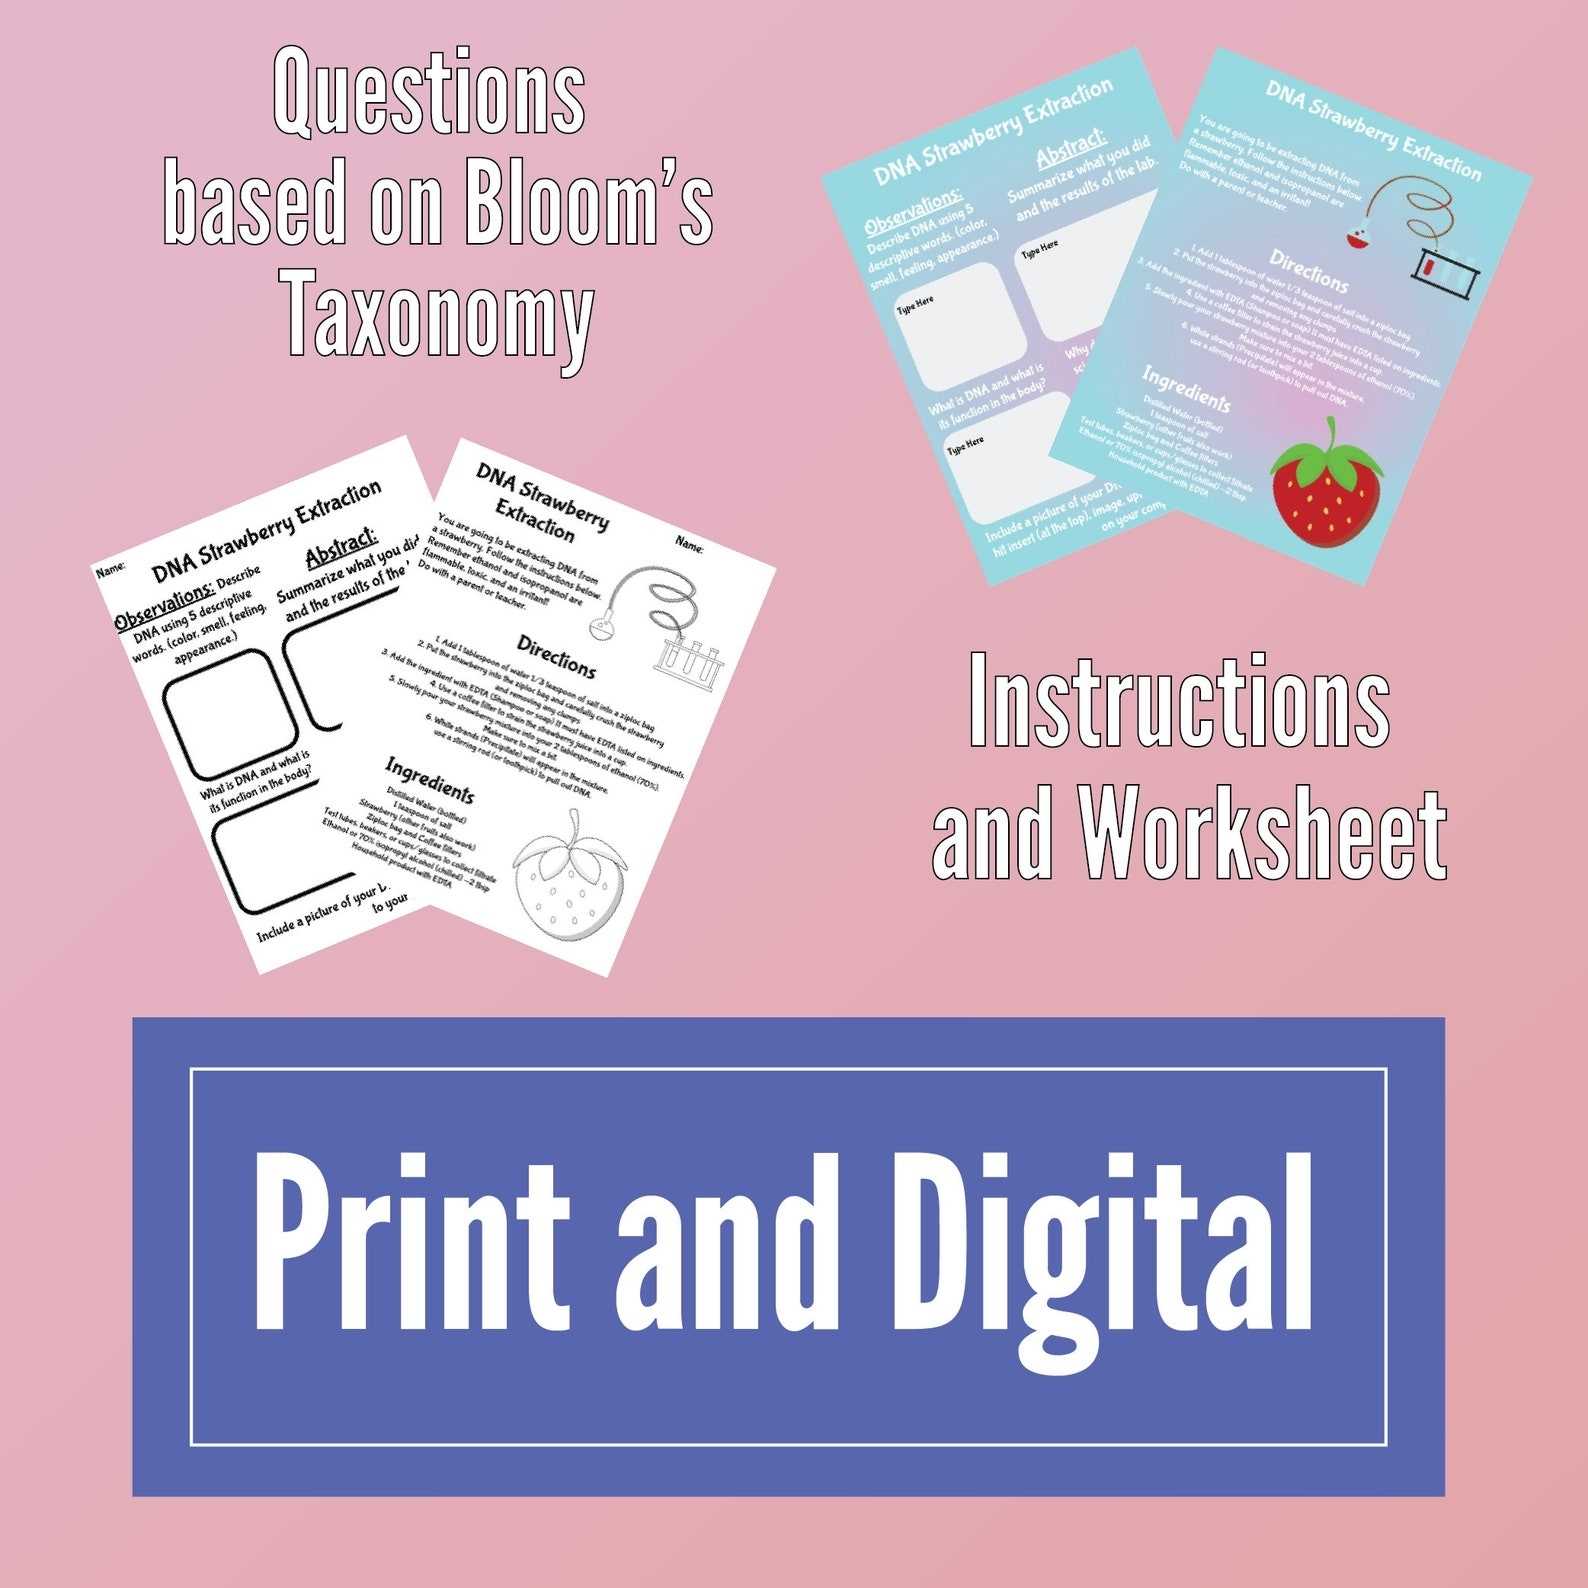
Exploring the Benefits of Using Strawberry DNA Extraction Lab Worksheets
The use of strawberry DNA extraction lab worksheets is a valuable tool for students of biology and genetics. They are a great way to help students gain a better understanding of the process of DNA extraction while providing an opportunity to practice the necessary skills. By completing the worksheets, students will gain the skills necessary to properly extract DNA from various sources, including strawberries.
Strawberry DNA extraction lab worksheets provide several benefits. First, they allow students to practice the skills necessary for successful extraction. This includes learning how to properly prepare the sample for analysis, as well as the proper techniques for harvesting the DNA from the sample. In addition, the worksheet allows students to practice their skills with a variety of different samples, from strawberries to bacteria or even human cells. This helps to ensure that students are able to apply their skills in a variety of settings.
Another benefit of using strawberry DNA extraction lab worksheets is that they can be used to facilitate collaborative learning. By having students work together on the worksheet, they can better understand the concepts of DNA extraction and practice working as a team to achieve a goal. This can be particularly beneficial in group settings, where students can learn from each other’s experiences and challenges. Additionally, working together on the worksheet can help to foster a greater sense of unity among the students.
[toc]
Finally, strawberry DNA extraction lab worksheets can be used to assess the progress of a student’s learning. By tracking the progress of the student’s work, instructors can better gauge the student’s knowledge and skills. This can be especially useful in tracking progress over time and can help instructors identify areas where additional instruction may be needed.
Overall, the use of strawberry DNA extraction lab worksheets can be a great way to help students gain a better understanding of the process of DNA extraction and practice the necessary skills. By providing an opportunity to practice and collaborate with other students, these worksheets can help to foster better learning experiences for students of all levels. Additionally, these worksheets can be used to assess a student’s progress over time and can help instructors identify areas where additional instruction may be necessary.
Reviewing the Process of DNA Extraction in a Strawberry Lab Worksheet
DNA extraction is an important process in the lab setting, and the extraction of DNA from a strawberry is a great way to showcase the steps involved in this process. This lab worksheet outlines the process of extracting the DNA from a strawberry.
The first step is to prepare the strawberry. This is done by mashing the strawberry in a mortar and pestle and then transferring it to a cup or tube. To this mix, a solution of detergent and salt is added. The detergent helps to break down the strawberry’s cell walls, while the salt helps to separate out the DNA from the other components of the cell.
Next, the mixture is filtered, using a cheesecloth, to remove any solids. This leaves a yellowish liquid, which contains the DNA. To this, cold isopropyl alcohol is added. This causes the DNA to precipitate out of the solution and form a white, cloudy mass.
The DNA is then collected carefully using a pipette and transferred to a tube. The DNA is then ready for further analysis.
This lab worksheet provides a useful overview of the process of extracting DNA from a strawberry. By following the steps outlined here, it is possible to collect and analyze DNA from a strawberry in a lab setting.
A Step-by-Step Guide to Extracting DNA from Strawberries
Introduction
The extraction of DNA from strawberries is an experiment that can help demonstrate the presence of genetic material in living organisms. DNA extraction is the process of isolating DNA molecules from the cells of living organisms. In this step-by-step guide, you will learn how to extract DNA from strawberries using common household materials.
Materials
You will need the following items to complete the DNA extraction experiment:
– Strawberries
– A blender or mortar and pestle
– Dish soap
– Isopropyl alcohol
– Salt
– Cheesecloth
– A cup or bowl
– A clear plastic straw
Step-by-Step Guide
1. Start by collecting the materials needed for the experiment.
2. Start by washing the strawberries in cold water and then place them in a blender or mortar and pestle.
3. Add a few drops of dish soap and a teaspoon of salt and blend or grind the strawberries until they are a slushy consistency.
4. Place the strawberry slush in a cup or bowl and add one cup of cold isopropyl alcohol.
5. Using a spoon, mix the strawberry slush and isopropyl alcohol for about three minutes.
6. Place a cheesecloth over the top of the cup or bowl and carefully pour the mixture into the cheesecloth.
7. Gently squeeze the cheesecloth over the cup or bowl to collect the liquid in the bowl.
8. Carefully pour the liquid into a clear plastic straw and place it in the refrigerator.
9. Allow the straw to sit in the refrigerator for 15 minutes.
10. After 15 minutes, remove the straw from the refrigerator and gently tap it on the counter to collect the strawberry DNA at the bottom of the straw.
11. Remove the DNA from the straw and examine it under a microscope.
Conclusion
DNA extraction from strawberries is a straightforward experiment that can yield interesting results. By following the steps outlined in this guide, you should be able to successfully extract DNA from a strawberry using simple materials found in most households.
Analyzing the Results of a Strawberry DNA Extraction Lab Worksheet
The purpose of this lab worksheet was to analyze the results of a strawberry DNA extraction lab. The lab was conducted to learn the steps involved in extracting DNA from a strawberry, as well as to observe the properties of the extracted DNA.
The lab began with the preparation of the strawberry puree, which was made by blending the strawberries in a blender. Once the puree was ready, the next step was to add a detergent solution and salt to the puree. Then, the mixture was vigorously shaken and allowed to sit for 10 minutes.
After the 10 minutes had passed, the mixture was filtered through a cheesecloth. The liquid that was left behind was the strawberry extract. Next, the extract was combined with a cold ethanol solution, which caused the DNA to precipitate out of solution. The DNA was then collected by pouring the extract-ethanol solution through a coffee filter.
The DNA that was collected was then analyzed. It was observed that the extracted DNA was a white, cloudy substance. Under a microscope, the DNA was observed to be long, thin strands. The strands were found to be coiled and tangled together.
Overall, the lab was a success. The students were able to successfully extract DNA from a strawberry, and observe the properties of the extracted DNA. The lab also provided an opportunity for the students to understand the steps involved in DNA extraction.
Investigating Different Techniques for Extracting DNA from Strawberries
DNA extraction is an important aspect of modern scientific research. As such, there are many different techniques for extracting DNA from various organisms. This paper aims to investigate some of these techniques as they pertain to strawberries.
One of the most common methods of DNA extraction is the use of a cell lysis buffer. This buffer is used to break down the cell walls and membranes of the strawberry, allowing the DNA to be released. This method can be done using a blender to break down the cells, or by heating them in a boiling water bath. The resulting solution is then filtered to remove any remaining cell walls, and the DNA can be collected from the solution.
Another common technique for DNA extraction is to use a detergent solution. This method involves soaking the strawberries in a detergent solution for a period of time. The solution breaks down the cell walls, allowing the DNA to be released. The solution is then filtered to remove any remaining cell walls, and the DNA can be collected from the solution.
A third method is to use an enzyme solution to break down the cell walls. This method involves soaking the strawberries in an enzyme solution for a period of time. The enzyme solution breaks down the cell walls, allowing the DNA to be released. The solution is then filtered to remove any remaining cell walls, and the DNA can be collected from the solution.
Finally, a fourth method of DNA extraction is to use a grinding method. This method involves grinding the strawberries in a mortar and pestle, or in a food processor, until a homogeneous paste is formed. The paste is then filtered to remove any remaining cell walls, and the DNA can be collected from the solution.
In conclusion, there are several different techniques for extracting DNA from strawberries. Each method has its own advantages and disadvantages, and it is important to consider the specific requirements of the research project before selecting a method. Careful consideration should also be given to the safety and health of the researcher when selecting a method.
Understanding the Role of Reagents in Strawberry DNA Extraction Lab Worksheets
Reagents play an essential role in the strawberry DNA extraction lab worksheet. Reagents are various chemicals or compounds used to carry out a specific chemical reaction or process. In the strawberry DNA extraction lab, the reagents used serve as a means to break down the cell wall, allowing for the extraction of the DNA.
The first reagent used in the laboratory is detergent. Detergent is used to break down the cell wall, allowing the DNA to be released. Additionally, detergent is used to ensure the DNA is not bound to any other molecule, making it easier to extract.
The second reagent used in the lab is a proteinase K solution. Proteinase K is an enzyme that helps break down proteins and other molecules in the cell wall. This helps to further break down the cell wall, making it easier to extract the DNA.
The third reagent used in the laboratory is ethanol. Ethanol acts as a precipitating agent, which causes the DNA to become visible and to separate from the other molecules in the cell. This allows for easier extraction of the DNA.
Finally, a buffer solution is used to maintain the pH balance of the solution. Buffers help to keep the pH of the solution at a constant level, allowing for a successful extraction of the DNA.
Overall, reagents play an essential role in the strawberry DNA extraction lab worksheet. These chemicals help to break down the cell wall, allowing for the extraction of the DNA. They also help to maintain the pH of the solution and keep the DNA separate from other molecules. By understanding the role of reagents in the lab, students can better comprehend the entire process of DNA extraction.
Considering the Difference between Homemade and Commercially-Sold Strawberry DNA Extraction Lab Worksheets
Strawberry DNA extraction is a popular laboratory experiment for students of all ages, and it can be conducted using either homemade or commercially-sold lab worksheets. While the core concepts and procedures are generally the same, there are some key differences between these two approaches.
Homemade lab worksheets are typically designed by an instructor for a particular class or grade level. They are often tailored to the specific expectations of the course, and may include instructions and diagrams to guide students as they progress through the experiment. These worksheets may also explain the underlying scientific concepts in greater depth than a commercially-sold worksheet, allowing students to gain a deeper understanding of the subject.
On the other hand, commercially-sold lab worksheets are pre-made and designed to be used by a variety of instructors and students. These worksheets usually come with a brief introduction to the experiment and a step-by-step procedure, but they are not as detailed as a homemade worksheet. The focus is more on the practical aspects of the experiment, so the underlying science is often not as thoroughly explained.
In conclusion, there are some key differences between homemade and commercially-sold strawberry DNA extraction lab worksheets. Homemade worksheets are tailored to the specific expectations of a course and may include more detailed explanations of the underlying science. In contrast, commercially-sold worksheets are pre-made and focus more on the practical aspects of the experiment.
Identifying the Lab Equipment Needed for a Strawberry DNA Extraction Lab Worksheet
This worksheet outlines the lab equipment needed for a successful strawberry DNA extraction laboratory experiment.
Materials:
– Centrifuge: This tool is used to separate and concentrate the soluble components of a sample, such as a strawberry, by spinning at high speeds.
– Microcentrifuge tubes: These small tubes are used to contain samples during centrifugation.
– Beakers: Beakers are used to measure, mix, and heat solutions.
– Graduated cylinders: Graduated cylinders are used to measure and transfer liquid volumes accurately.
– Distilled water: Distilled water is used to prepare solutions, such as the lysis solution used to break open the cells of the strawberry.
– Mortar and pestle: The mortar and pestle are used to grind the strawberry into a fine paste.
– Filter paper: Filter paper is used to separate the solids from the liquids during the extraction process.
– Ice bath: An ice bath is used to keep solutions cold during the extraction process, as heat can denature the DNA.
– Ethanol: Ethanol is used to precipitate the DNA out of solution.
– Pipettes: Pipettes are used to transfer small volumes of liquid accurately.
– Microfuge: This tool is used to spin the sample at high speeds for a short period of time in order to pellet the DNA.
Understanding Safety and Sterility in a Strawberry DNA Extraction Lab Worksheet
In the strawberry DNA extraction lab, safety and sterility are of paramount importance. All participants must take the necessary precautions to ensure their safety and the safety of those around them.
Before beginning the lab, all participants must put on the appropriate personal protective equipment (PPE). This includes safety glasses, a lab coat, and gloves. Additionally, all participants should tie their hair back, as loose hair can be dangerous when working with laboratory equipment. Once the PPE is in place, participants must take time to ensure their work station is clean and free of any contaminants.
Throughout the lab, all participants must practice good laboratory hygiene. This includes washing their hands before and after handling any materials, and avoiding contact with any surfaces that could potentially be contaminated. Additionally, all participants must avoid eating, drinking, or chewing gum in the laboratory. All equipment must be handled with care, and surfaces must be wiped down with an appropriate disinfectant between each step to maintain sterility.
Finally, as the lab comes to a close, all participants must clean up their work station and properly dispose of any materials used. All glassware must be cleaned and sterilized or discarded. All surfaces must be wiped down with an appropriate disinfectant. Any materials used in the lab must be disposed of properly according to established protocols.
By following these steps, participants in the strawberry DNA extraction lab can ensure their safety and the sterility of the laboratory environment.
Steps for Ensuring Successful Results from a Strawberry DNA Extraction Lab Worksheet
1. Prepare the necessary materials and tools needed for the lab. These may include a blender, test tubes, a micropipette, a beaker, a mortar and pestle, a filter paper, and a microcentrifuge.
2. Ensure that the lab environment is clean and organized. This will help to prevent contamination of the samples.
3. Read through the lab worksheet thoroughly and understand the steps that need to be taken.
4. Explain the lab to the students so that they understand the purpose of the experiment and the steps that need to be taken.
5. Ensure that the lab worksheet is properly labeled. This will help the students keep track of their progress throughout the experiment.
6. Set up the lab correctly and make sure that each student has the necessary equipment and supplies.
7. Demonstrate the techniques that need to be used during the experiment.
8. Monitor the students throughout the experiment and provide guidance and feedback when necessary.
9. Collect the samples and store them properly.
10. Analyze the samples and review the results to ensure that the experiment was successful.
11. Review the lab worksheet with the students and discuss the results.
Conclusion
In conclusion, the Strawberry DNA Extraction Lab Worksheet was a great lab to do and was a fun exploration of the science of DNA extraction. We were able to observe how different methods of extraction can be used to get the desired results, as well as understand how the process works. The lab also gave us a better understanding of the components of DNA and the importance of each step in the extraction process.
[addtoany]
5 photos of the "Strawberry Dna Extraction Lab Worksheet"
Related posts of "Strawberry Dna Extraction Lab Worksheet"
Possessive Adjectives Spanish Worksheet
How to Use Possessive Adjectives in Spanish: A Step-by-Step WorksheetPossessive adjectives are an important part of Spanish grammar and are used to indicate ownership or possession of a particular object or person. This worksheet will help you understand how to use possessive adjectives correctly in Spanish. Step 1: Understand the Basics Before you begin using...
Nitrogen Cycle Worksheet Answers
A Comprehensive Guide to Interpreting Nitrogen Cycle Worksheet AnswersThe Nitrogen Cycle is an essential part of the Earth’s ecosystem, as it is a key component in the process of nutrient cycling. Understanding how the cycle works is essential for any student of biology, ecology, and environmental science. As such, many educational institutions require students to...

Rotations Worksheet 8th Grade
Analyzing Rotations with 8th Grade Geometry: A Step-by-Step Guide Rotating an object is a fundamental concept in geometry. It involves taking an object and moving it around a fixed point, known as the center of rotation. For 8th grade students, analyzing rotations can be a challenging and sometimes intimidating task. This step-by-step guide is designed...
El Verbo Ser Worksheet Answers
Exploring the Uses of El Verbo Ser in Spanish: An Analysis of El Verbo Ser Worksheet AnswersEl verbo ser es uno de los verbos más importantes para los estudiantes de español. El verbo ser se utiliza para identificar características, recursos, y la identidad de personas, lugares, cosas, y situaciones. Esta palabra se usa para describir...