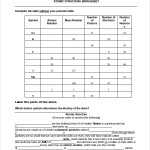
Exploring Microscope Parts: A Comprehensive Guide for Students
The microscope is an essential tool for many scientific fields, allowing researchers to observe small specimens in great detail. In order to effectively use a microscope, it is important to be familiar with the various parts and components that make up its construction. This guide will provide an overview of the essential elements of a microscope, so students can better understand how to use and care for this important piece of laboratory equipment.
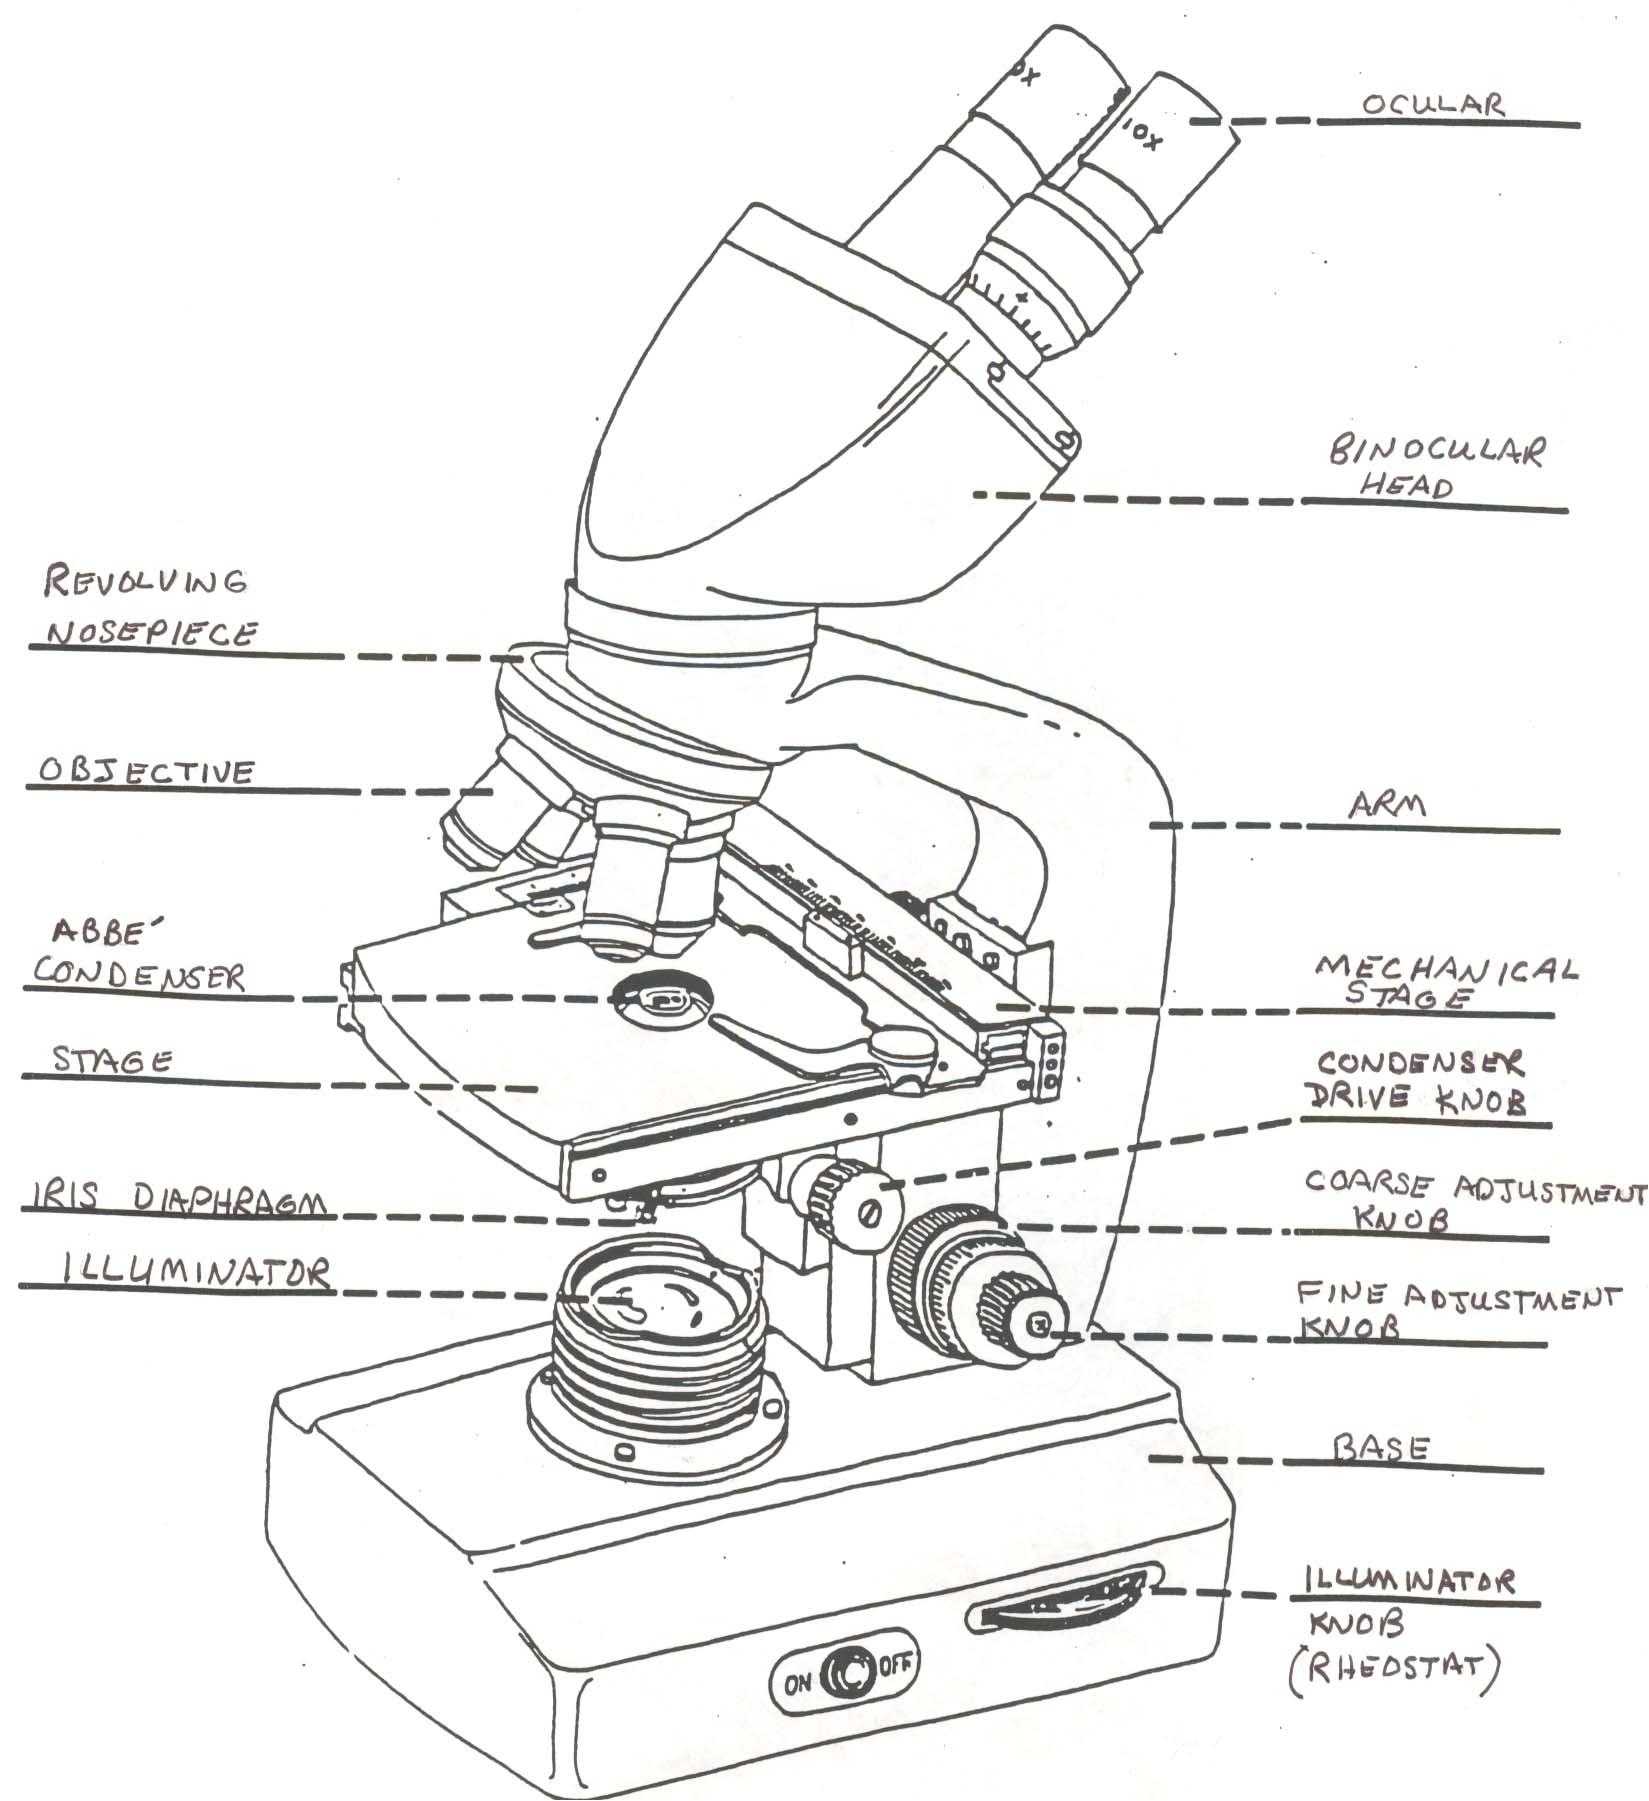
The body of the microscope is a rigid, cylindrical tube that contains the optical components. It is usually made of metal, though some models may feature a plastic exterior. The body houses the eyepiece, which is the lens through which the specimen is viewed. It is typically located at the top of the microscope, and may be adjustable for better focusing.
The objective lens is located at the bottom of the body, and is the lens that actually magnifies the specimen. It is usually composed of multiple elements, including a condenser lens, which focuses light onto the specimen, and an objective lens, which magnifies the image. The objective lenses are interchangeable, allowing researchers to switch between different magnifications.
[toc]
The stage is located at the base of the body, and is the platform on which the specimen is placed. It is typically composed of two parts: a fixed lower stage and a movable upper stage. The upper stage can be adjusted to focus the specimen, and is often equipped with a control knob or lever. The stage is also typically equipped with clips, which are used to secure the specimen during observation.
The illuminator is the light source that is used to illuminate the specimen. It is usually located below the stage, and is typically adjustable to allow for different levels of brightness. The illuminator is usually equipped with an iris diaphragm and a filter wheel, which can be used to further customize the lighting for optimal viewing.
Finally, the arm of the microscope is the main support structure for the other components. It is typically adjustable, allowing the user to set the desired height and angle for observation.
By understanding the various parts of a microscope, students can gain a better appreciation for this important tool and learn how to properly use and care for it. With the right knowledge and care, a microscope can provide years of reliable service and enable researchers to explore the microscopic world.
A Guide to Utilizing Microscope Parts and Accessories for Effective Lab Work
Using microscope parts and accessories effectively is essential for successful lab work. To ensure that you get the most out of your lab time and achieve the best results, it is important to understand the different components and how they can be used together to perform a variety of tasks.

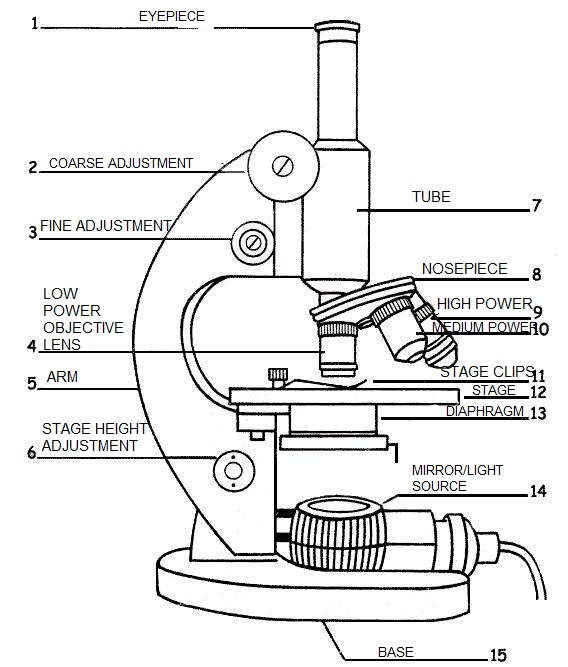
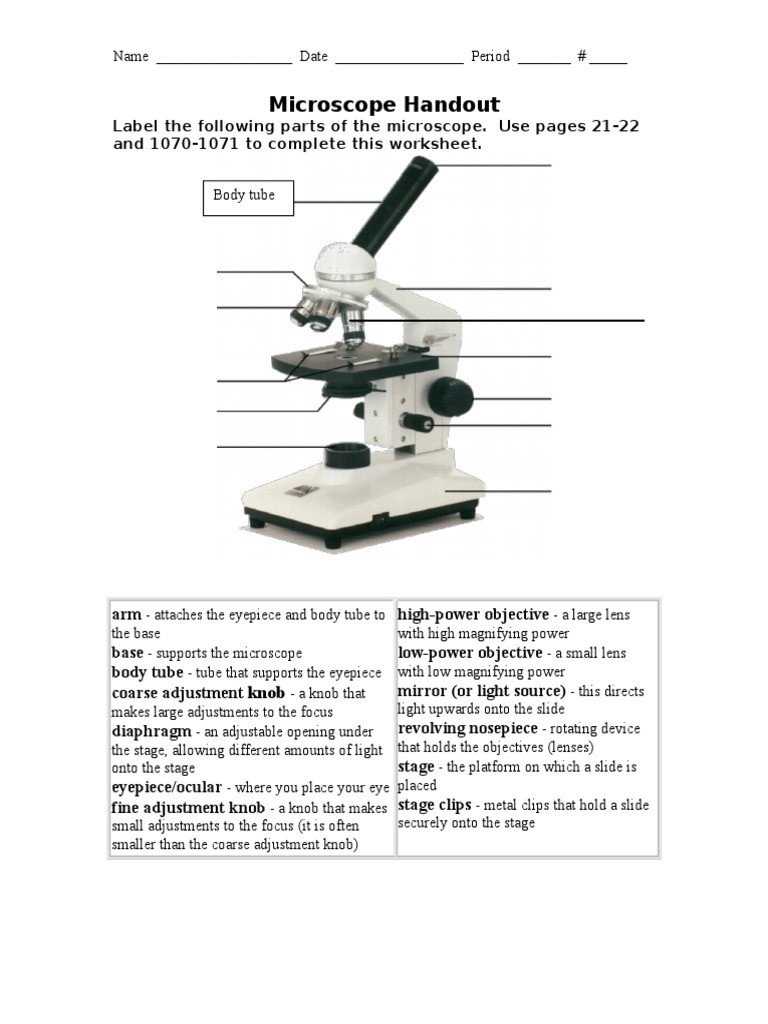
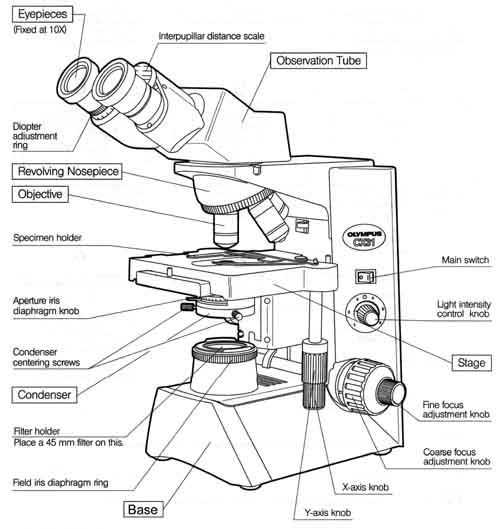
The microscope itself is the main component of any lab setup. It is composed of several parts, including the base, arm, head, and stage. The base provides a stable platform for the microscope and often includes a light source and controls. The arm is the support that holds the head and the stage is the platform where samples can be placed for observation.
The eyepiece is the part of the microscope that is used for viewing the sample. It contains two lenses that magnify the image and provide a clear view of the sample. To increase the magnification of the sample, additional objective lenses can be added. Objective lenses are designed to magnify the sample at different magnifications and can be changed based on the task at hand.
The stage is the platform on which the sample is placed. It is often equipped with a mechanical stage that allows for precise movement of the sample. The condenser is a device that is used to focus light on the sample, providing optimal illumination. The iris diaphragm is a disk-like device that is used to adjust the amount of light that is used to illuminate the sample.
Various types of accessories can be used to enrich the lab experience. A micromanipulator is a device that is used to move the sample in a precise manner and can be used for tasks such as adjusting the focus or changing the magnification. A camera attachment can be used to take pictures of the sample, allowing for further analysis and documentation.
Microscopes are powerful tools for performing a variety of tasks in the lab. By understanding the different components and accessories and how they can be used together, you can maximize the efficiency of your lab work and achieve the best results.
How to Use a Microscope Worksheet: Step-by-Step Instructions for Beginners
Using a microscope can be an exciting experience for curious minds. With a few simple steps and a bit of practice, you can use a microscope to observe the natural world around you with amazing detail. To help you get started, here is a step-by-step guide on how to use a microscope:
1. Set-up: Before you begin, make sure that your microscope is properly set up. Ensure that the base is flat and stable, and that the arm and head are securely fastened together. Place the power switch in the “On” position, adjust the light source to the desired intensity, and focus the lens using the coarse and fine adjustment knobs.
2. Prepare the specimen: When preparing the specimen for viewing, use a prepared slide, or make your own. If you are making your own slide, start by placing a drop of oil or water onto the slide, then add the specimen and cover it with a coverslip.
3. Place the slide on the microscope: Place the slide onto the microscope stage, making sure that the specimen is facing the light source. Use the stage clips to keep the slide in place.
4. Choose the objective lens: Use the revolving nosepiece to select the desired objective lens. It is best to start with the low power objective lens and move up to the higher power lenses as needed.
5. Focus the specimen: Use the coarse adjustment knob to move the stage up and down until the specimen comes into focus. Then use the fine adjustment knob to fine-tune the focus.
6. Observe the specimen: Once the specimen is in focus, you can begin to observe the specimen. Use the knobs to move the stage around and view different parts of the specimen. When you are done viewing the specimen, turn off the microscope and remove the slide.
By following these steps, you can quickly and easily learn to use a microscope and explore the world around you. With a little practice, you’ll be observing the natural world with amazing detail in no time.
The Different Types of Microscope Parts and Their Uses in the Lab Setting
A microscope is an essential tool for researchers and scientists across many fields. It is composed of several parts, each with its own distinct purpose. In this article, we will discuss the different types of microscope parts and their uses in a lab setting.
The most basic, yet essential, microscope part is the eyepiece. This is the part of the microscope through which the user views the specimens, and it typically magnifies objects by 10x. The eyepiece is usually adjustable, allowing the user to adjust the focus and clarity of the image.
The objective lenses are the most important parts of a microscope. Each lens has a different level of magnification, ranging from 4x up to 100x. The lenses are attached to the body of the microscope, and they are adjustable to help the user focus on the specimen.
The stage is the part of the microscope on which the specimen is placed. Most stages are adjustable, allowing the user to move the specimen around to get a better view. The stage also contains a light source, usually a bulb or LED, to provide the necessary illumination for viewing the specimen.
The condenser is the part of the microscope that focuses the light from the light source onto the specimen. This allows the user to get a clearer and more detailed view of the specimen, as the light is concentrated on the area of interest.
The diaphragm is a component of the microscope that can adjust the amount of light that is reaching the specimen. This allows the user to fine-tune the amount of light, depending on the specimen they are viewing.
The mechanical stage is a component of some microscopes that allows the user to move the specimen around in a precise and controlled manner. This allows the user to get a more detailed and accurate view of the specimen.
Finally, the coarse and fine focus knobs are located on the side of the microscope and allow the user to adjust the focus of the specimen. The coarse knob adjusts the focus in large increments, while the fine knob allows for finer adjustments.
In conclusion, microscopes are composed of many parts, each with a distinct purpose in the lab setting. The eyepiece, objective lenses, stage, condenser, diaphragm, mechanical stage, and coarse and fine focus knobs are all essential components of a microscope, and each plays an important role in allowing the user to view a specimen in detail.
Conclusion
This Microscope Parts And Use Worksheet is a great resource for anyone interested in learning more about microscopes. It provides an overview of the different parts of a microscope and how they are used, as well as a step-by-step guide to using a microscope. With this worksheet, students can gain a better understanding of the different parts of a microscope and how they work together to produce a clear image. By understanding the different parts and use of a microscope, students can become more knowledgeable in the field of microscopy.
[addtoany]
5 photos of the "Microscope Parts And Use Worksheet"
Related posts of "Microscope Parts And Use Worksheet"
Atomic Structure Review Worksheet
How Atomic Structure Review Worksheets Can Help Students Master Chemistry ConceptsAtomic structure review worksheets are invaluable tools for helping students to master the fundamentals of chemistry. These worksheets provide a comprehensive review of the various elements of atomic structure, including their structure, properties, and behavior. By providing students with a structured review, these worksheets help...
Pythagoras Theorem Worksheet Pdf
Exploring the Benefits of Using a Pythagoras Theorem Worksheet Pdf in the ClassroomThe Pythagoras Theorem worksheet pdf is a useful and engaging tool that can be used in the classroom to help students understand the famous theorem of the ancient Greek mathematician, Pythagoras. This theorem states that in a right triangle, the square of the...

Negative Exponents Worksheet Pdf
How to Use a Negative Exponents Worksheet Pdf to Teach Your StudentsNegative exponents are an important concept for students to understand in mathematics. Using a negative exponents worksheet pdf can be an effective tool for teaching students this concept. These worksheets are designed to help students understand the rules of negative exponents and how to...
Acids And Bases Worksheet Answers
Unpacking Acids and Bases Worksheet Answers: A Comprehensive GuideAcids and bases are important components of chemical reactions and understanding their properties is essential for any student of chemistry. Acids and bases can be identified by a variety of characteristics, including taste, reactivity, and concentration. This worksheet will help students understand the different properties of acids...