Understanding the Heating Curve Worksheet Answers: Breaking Down the Different Sections
Section 1: Introduction

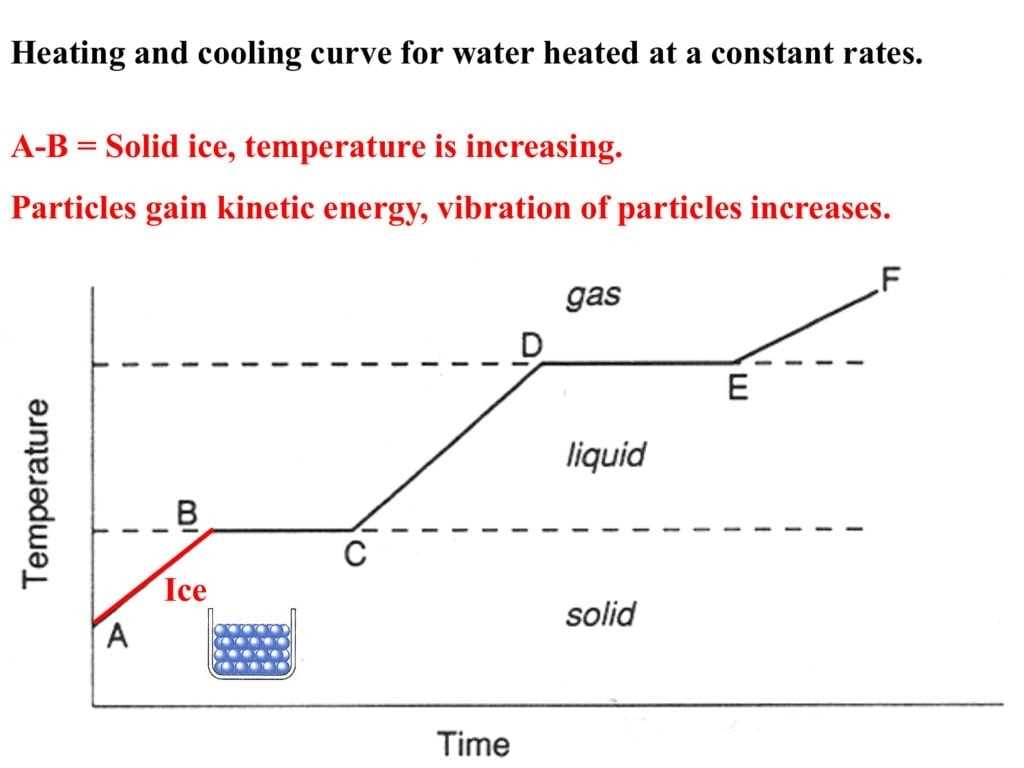
The Heating Curve is a graphical representation of the changes in temperature of a substance as it is heated. It shows the relationship between temperature and the energy required to heat the substance. This worksheet will explain the different sections of the Heating Curve and how each part represents the energy required to heat the substance.
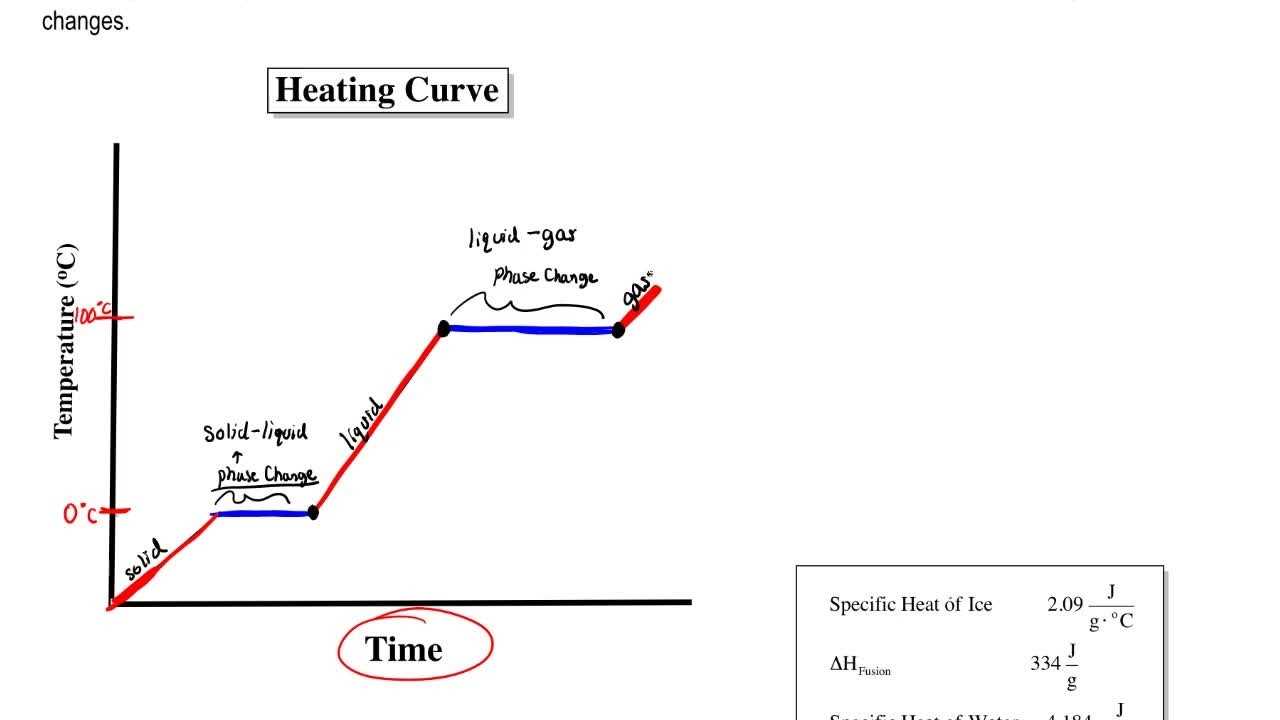
Section 2: Solid
[toc]
The first section of the Heating Curve is the Solid section. This is the part of the graph that shows the temperature of the substance as it is heated from a solid state. As the temperature increases, the energy required to heat the substance also increases. This is due to the fact that it takes more energy to break the bonds between the particles in a solid than it does to heat a liquid or gas.
Section 3: Liquid
The second section of the Heating Curve is the Liquid section. This is the part of the graph that shows the temperature of the substance as it is heated from a liquid state. As the temperature increases, the energy required to heat the substance decreases. This is because it takes less energy to heat a liquid than it does to heat a solid.
Section 4: Gas
The third section of the Heating Curve is the Gas section. This is the part of the graph that shows the temperature of the substance as it is heated from a gas state. As the temperature increases, the energy required to heat the substance decreases. This is because it takes less energy to heat a gas than it does to heat a solid or liquid.
Section 5: Conclusion
The Heating Curve is a graphical representation of the changes in temperature of a substance as it is heated. It shows the relationship between temperature and the energy required to heat the substance. Each section of the Heating Curve represents a different state of the substance and how much energy is required to heat it. Understanding the Heating Curve can help us better understand the properties of different materials and how they react to heat.
The Benefits of Using Heating Curve Worksheet Answers to Check Your Understanding of Concepts
Heating Curve Worksheet Answers offer a great way to check your understanding of concepts related to the heat transfer process. The worksheets provide a step-by-step approach to help you understand the various processes by which heat is transferred, such as conduction, convection, and radiation. By understanding the concepts behind each process, you can more effectively determine how to apply them in practical situations.
The worksheet answers provide a comprehensive explanation of the concepts and how they interact with each other. The worksheet also provides a visual representation of the heat transfer process and its various stages, which can help you better understand the theory and practice. By taking the time to answer the questions, you can gain a better understanding of the concepts and be able to apply them in real-world situations.
The worksheet answers also provide an opportunity to learn about the various variables that affect the heat transfer process. Knowing the different factors that influence the rate at which heat is transferred can help you understand how to adjust the parameters to optimize the process. Additionally, the answers provide an opportunity to explore the implications of different temperatures, material properties, and geometries on the heat transfer process.
Using the answers to the worksheet can provide a good understanding of the concepts behind the heat transfer process. By understanding the different processes and their interactions, you can gain a better appreciation of the importance of the various parameters that affect the process. This can help you to make more informed decisions when trying to optimize a particular process.
The worksheet answers are also useful for testing your understanding of the concepts. By taking the time to answer the questions, you can get an idea of how much you know and understand about the various concepts. This can help you identify areas that may require further study or practice.
The answers to the worksheet can be used in conjunction with other resources to further your understanding of the concepts. For example, you can use the answers to the worksheet to supplement a lecture or demonstration. Additionally, the answers can be used to supplement a textbook or other study materials.
Overall, Heating Curve Worksheet Answers are an effective tool for checking your understanding of concepts related to the heat transfer process. By taking the time to answer the questions and exploring the implications of the various variables that affect the process, you can gain a better understanding of the concepts and be better prepared to apply them in practical situations. The answers also provide an opportunity to test your understanding of the concepts, so you can identify areas that may require further study or practice.
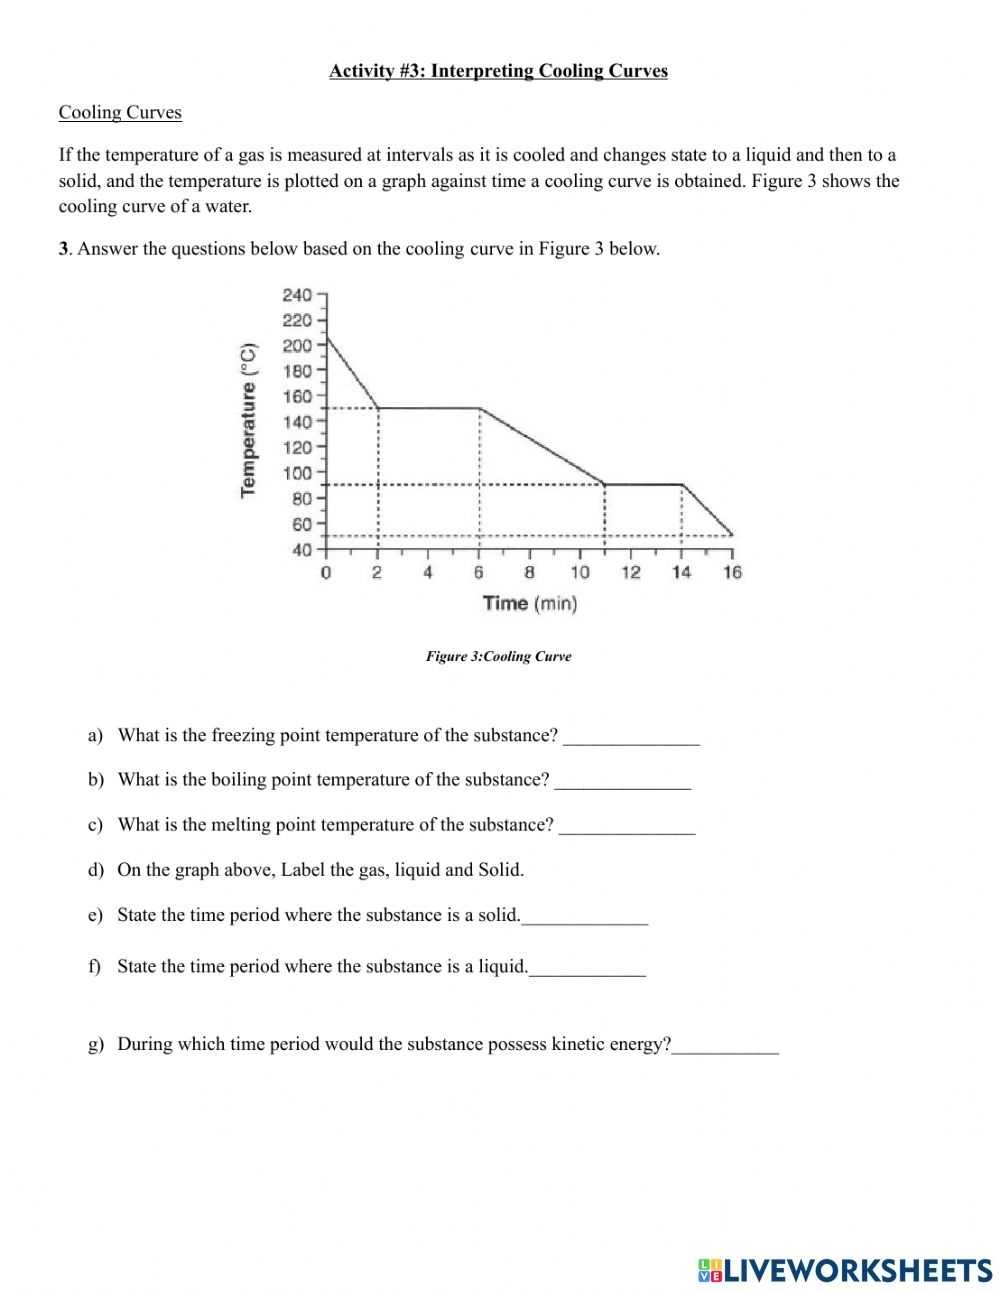
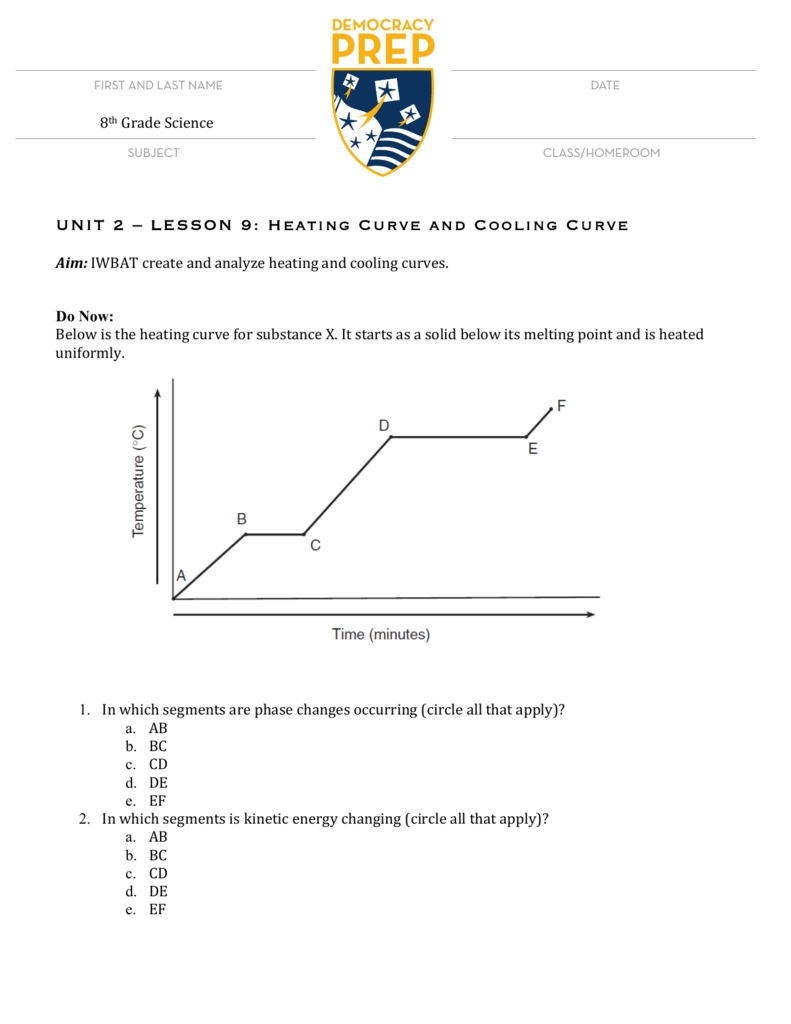
A Step-by-Step Guide to Constructing a Heating Curve Worksheet Answer
1. Begin by gathering all the necessary materials for your heating curve worksheet. This includes a thermometer, a calculator, a chart to plot the data points, a ruler, and any other materials you may need.
2. Set the thermometer to the desired temperature and record the initial temperature. This temperature should be the starting point of your heating curve.
3. Heat up the temperature of the object you are studying in intervals of your choosing. Make sure to record the temperature at each interval.
4. Using the ruler, chart the data points on the chart. Make sure to label each data point with the corresponding temperature.
5. Using the calculator, calculate the average temperature of the intervals. This will be used to determine the slope of the heating curve.
6. Using the ruler, draw a line on the chart connecting each data point. This will be your heating curve.
7. Analyze and interpret the heating curve. Make sure to note any trends or changes in the heating curve.
8. Use the data points and the average temperature to determine the total energy absorbed or released by the object.
9. Record the findings on the heating curve worksheet.
10. Once all the data has been collected and analyzed, use the heating curve worksheet to draw conclusions about the object being studied.
How to Interpret Heating Curve Worksheet Answers to Determine Your Grade
Interpreting the answers on a heating curve worksheet can help you assess your understanding of the material and determine your grade. To do this, begin by analyzing the questions and the answers provided on the worksheet. Look for any areas in which your answers may have been incorrect and assess the accuracy of your reasoning. If there were any questions that you found particularly difficult, make sure to review the concepts related to it.
Once you have analyzed your answers, calculate your total score. Depending on the difficulty of the worksheet, the teacher may have assigned a different grade to each question. For example, some questions may be worth one point, while others may be worth three or four points. This information should be listed on the worksheet so you can easily add up your total score.
Finally, compare your total score with the grade scale provided by the teacher. This will let you know what grade you earned on the worksheet. If you are unsatisfied with your grade, review the material again and consider taking a practice test or requesting extra help from the teacher. With the help of practice and review, you can ensure that you understand the material and confidently earn the grade you desire.
Conclusion
In conclusion, the Heating Curve Worksheet Answers provide a great way to gain insight into the phases of matter and the energy and temperature changes associated with each phase. They can also help students understand the concepts of heat transfer and the relationships between pressure, temperature, and volume. With this understanding, students can better apply the concepts to real-world applications and use them to solve problems.
[addtoany]
5 photos of the "Heating Curve Worksheet Answers"
Related posts of "Heating Curve Worksheet Answers"

Prime And Composite Numbers Worksheet
How Can a Prime and Composite Numbers Worksheet Help Kids Understand Math Concepts?A prime and composite numbers worksheet can be a valuable tool for helping kids understand math concepts. This type of worksheet provides a visual representation of the different types of numbers, and allows kids to gain an understanding of how these numbers can...
Subjects And Predicates Worksheet
How to Teach Students the Basics of Subjects and Predicates Using a WorksheetTeaching students the basics of subjects and predicates can be a challenging task and a worksheet can be a useful tool to help make the process simpler. Step 1: Introduce the concepts of subjects and predicates to the students. Explain that a subject...

Schedules Of Reinforcement Worksheet
Exploring the Benefits of Utilizing a Schedules of Reinforcement Worksheet for Effective Behavioral Modification Utilizing a schedules of reinforcement worksheet is a powerful tool for effective behavioral modification. It is a system of rewards and punishments used to shape behavior and can be employed across a variety of settings, including the home and the classroom....

Erosion And Deposition Worksheet
Exploring the Causes and Effects of Erosion and Deposition Through a Worksheet ActivityErosion and deposition are two of the most common and important processes that shape the physical environment of the Earth. Erosion is the process by which wind, water, and other natural forces wear away at the surface of the Earth, while deposition is...